
Get started with Juju
Juju is a tool for provisioning cloud infrastructure and deploying and operating applications on that infrastructure using charms. Charms are software packages that contain code for how to operate an application. Juju and charms work together to provide a cloud- and application-agnostic operations solution for any major operation (provision, install, configure, integrate, scale, upgrade, …) on any type of cloud (Kubernetes or machines).
In this tutorial you will get acquainted with Juju and charms by deploying a chat service on a Kubernetes cloud.
What you’ll need:
A workstation that has sufficient resources to launch a virtual machine with 4 CPUs, 8 GB RAM, and 50 GB disk space.
Familiarity with a terminal.
What you’ll do:
Set up an isolated test environment with Multipass, then set up Juju with a localhost MicroK8s cloud, and use it to deploy, configure, and integrate the charms required to set up a chat service based on Mattermost and PostgreSQL.
Set up an isolated test environment
When you’re trying things out it’s nice to work in an isolated test environment. Let’s spin up an Ubuntu virtual machine (VM) with Multipass!
First, install Multipass.
Now, launch an Ubuntu VM using the cloud-init file provided with this tutorial. The cloud-init file automates the MicroK8s setup inside the VM, so you can focus on the Juju-specific steps:
~$ Launched: my-juju-vm
The cloud-init script runs in the background and typically takes 5–10 minutes. Wait for it to finish before opening a shell:
~$ status: done
Now open a shell in the VM:
~$ Welcome to Ubuntu 24.04 LTS (GNU/Linux ...)
...
(If the VM launch fails, run multipass delete --purge my-juju-vm to clean up, then try the launch line again.)
Anything you type after the VM shell prompt (ubuntu@my-juju-vm:~$) will run on the VM.
At any point:
To exit the shell, press mod + C (e.g., Ctrl+D) or type
exit.To stop the VM after exiting the VM shell, run
multipass stop my-juju-vm.To restart the VM and re-open a shell into it, type
multipass shell my-juju-vm.
Set up Juju
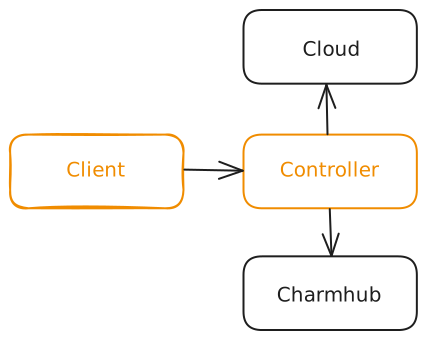
Juju consists of at least a client and a controller, and needs access to a cloud (anything that can provide compute, networking, and storage) and to Charmhub (the charm store; otherwise, a local source of charms).
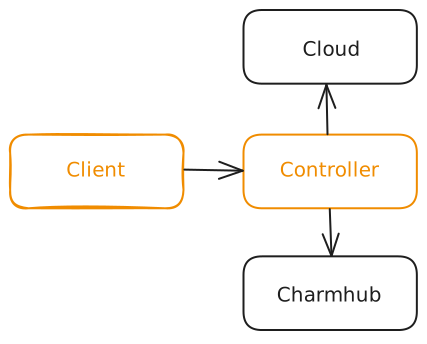
Juju consists of at least a client and a controller, and needs access to a cloud (anything that can provide compute, networking, and storage) and to Charmhub (the charm store; otherwise, a local source of charms).
The way Juju works is that you use a client to talk to a controller; the controller talks to a cloud to provision infrastructure and to Charmhub (or a local source for charms) to get charms to deploy, configure, integrate, scale, upgrade, etc., applications on that infrastructure; and the controller itself must live on a cloud resource, so before you do any of that you must use the client to talk to a cloud and Charmhub to bootstrap the controller into the cloud. Let’s prepare all those pieces and make sure your Juju is good to go!
Prepare your cloud
To Juju a cloud is anything that has an API where you can request compute, storage, and networking.
This includes traditional machine clouds (Amazon AWS, Google GCE, Microsoft Azure, but also MAAS, OpenStack, Oracle OCI, and LXD) as well as Kubernetes clusters (Amazon EKS, Google GKE, Microsoft AKS but also Canonical Kubernetes or MicroK8s).
In this tutorial we will use MicroK8s, a lightweight Kubernetes that you can also use to get a small, single-node localhost Kubernetes cluster. The cloud-init file already took care of installing and configuring MicroK8s on your VM. Verify it is running:
ubuntu@my-juju-vm:~$ microk8s is running
high-availability: no
datastore master nodes: 127.0.0.1:19001
datastore standby nodes: none
...
Congratulations, your cloud is ready!
Prepare Charmhub
So long as you’re connected to the internet, your Juju can automatically reach Charmhub – nothing to be done.
Set up the juju CLI client
In Juju a (user-facing) client is anything that can talk to a Juju controller, and there are multiple clients available. However, to get a Juju controller you need the juju CLI client and it must have access to a cloud and Charmhub. Let’s set it up!
In your VM, install the juju CLI client:
ubuntu@my-juju-vm:~$ Now, ensure the client has access to your cloud (i.e., knows where to find your cloud and has the credentials to access your cloud). For a localhost MicroK8s cloud installed from a strictly confined snap like ours, your juju client can read the local kubeconfig file and retrieve the cloud definition (and credentials) from there automatically, as you can verify:
ubuntu@my-juju-vm:~$ Only clouds with registered credentials are shown.
There are more clouds, use --all to see them.
You can bootstrap a new controller using one of these clouds...
Clouds available on the client:
Cloud Regions Default Type Credentials Source Description
localhost 1 localhost lxd 0 built-in LXD Container Hypervisor
microk8s 1 localhost k8s 1 built-in A Kubernetes Cluster
(If this doesn’t show any output: Exit the VM (exit), re-enter it (multipass shell my-juju-vm), then try again.)
Ensure also that the client has access to Charmhub by performing a random search, e.g., using the keyword “ingress”, and then asking for more information about one of the results it shows:
ubuntu@my-juju-vm:~$ # Output should show all the charms or charm bundles related to this query that are available on Charmhub.
# For best results always double-check Charmhub.
ubuntu@my-juju-vm:~$ # Output should show name, publisher, quick description, integration endpoints, etc.
# For the full features and more info see directly the charm's page on Charmhub.
Our juju client is ready! Take a quick look at what it can do: juju help commands. (You can also pipe a query to zoom in on feature: juju help commands | grep application.)
Tip
Split your terminal window into 3 (or open 3 terminal windows). In all, access your Multipass VM shell (multipass shell my-juju-vm) and then:
Shell 1: Keep using it as you’ve already been doing so far, namely to type the commands in this tutorial.
Shell 2: Run watch -n 1 -c juju status --relations --color to watch your deployment status evolve. Things are all right if your App Status and your Unit - Workload reach active and your Unit - Agent reaches idle. To exit and return to the terminal prompt, press mod + C (e.g., Ctrl+C). See more: Status
Shell 3: Run juju debug-log -m controller to watch all the details behind your deployment status. (Especially useful when things don’t evolve as expected. In that case, please get in touch.)
Set up a Juju controller
A Juju controller is your Juju control plane – the entity that holds the Juju API server and Juju’s database. Anything you do in Juju post-controller-setup goes through a Juju controller, and to work properly the controller needs access to a cloud and to Charmhub (or a local source of charms). Let’s set it up!
In your VM, use your client and its access to the MicroK8s cloud to bootstrap a Juju controller:
ubuntu@my-juju-vm:~$ Creating Juju controller "my-first-juju-controller" on microk8s/localhost
Bootstrap to Kubernetes cluster identified as microk8s/localhost
Creating k8s resources for controller "controller-my-first-juju-controller"
Downloading images
Starting controller pod
Bootstrap agent now started
Contacting Juju controller at 10.152.183.180 to verify accessibility...
Bootstrap complete, controller "my-first-juju-controller" is now available in namespace "controller-my-first-juju-controller"
Now you can run
juju add-model <model-name>
to create a new model to deploy k8s workloads.
This will use ingredients from your client, the juju-controller charm from Charmhub and a pod from MicroK8s (backed by your current node – your VM) to give you a running Juju controller.
Now, to be fully operational a controller needs access to a cloud and to Charmhub (or a local source for charms). Our controller already has access to our ‘microk8s’ cloud – this access was granted implicitly through bootstrap. Also, as before, so long as you’re connected to the internet, your controller has access to Charmhub too. Your controller is all set!
At this point we could connect to it further clouds or set up the Juju dashboard. For the purpose of this tutorial, however, we will skip ahead to talking about users and permissions.
Handle authentication and authorization
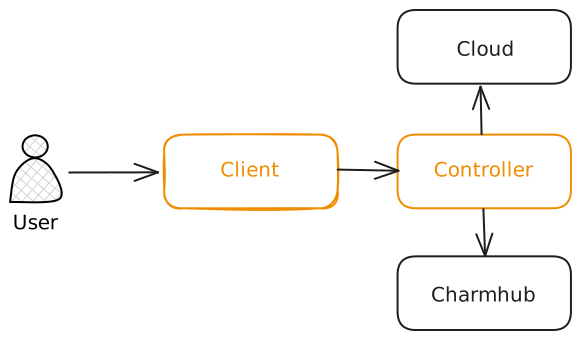
A user is any person that can log in to a Juju controller.
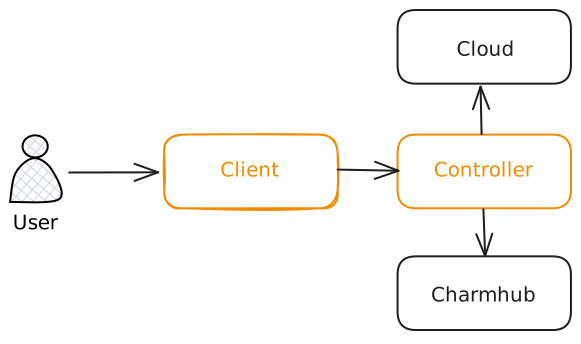
A user is any person that can log in to a Juju controller.
Your client and controller can already talk to a cloud and Charmhub, but they don’t run on their own – enter the user! In Juju, the user is any person that can log in to a controller, and what they can do can be controlled at the level of the controller or some of the smaller entities associated with that controller. As the entity that has bootstrapped the controller, you have automatically been logged in and given superuser access. Let’s verify:
ubuntu@my-juju-vm:~$ Controller: my-first-juju-controller
Model: <no-current-model>
User: admin
ubuntu@my-juju-vm:~$ user-name: admin
display-name: admin
access: superuser
date-created: 3 hours ago
last-connection: just now
At this point you could add further users and control their permissions. However, for the purpose of this tutorial, we will skip ahead and deploy our chat service!
Provision infrastructure and operate applications
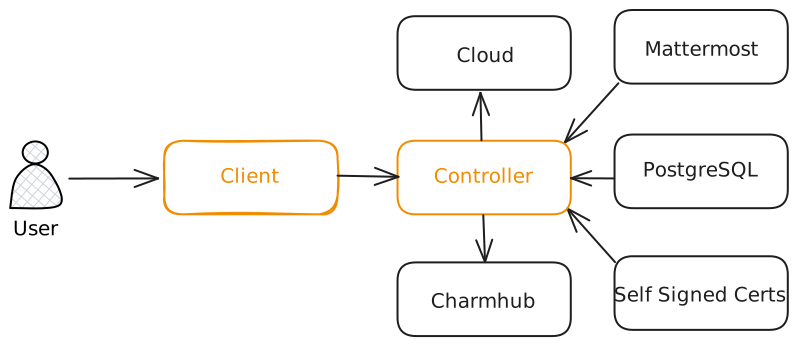
A user interacts with the client to reach the controller. The controller talks to the cloud and to Charmhub to provision infrastructure and to deploy charms. Next to a deployed charm there is always a Juju agent which periodically checks its internal state against the Juju controller and executes the deployed charm accordingly to install, configure, and otherwise manage applications.
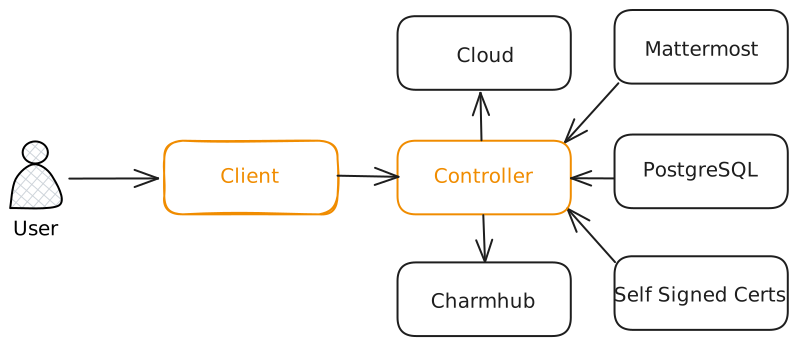
A user interacts with the client to reach the controller. The controller talks to the cloud and to Charmhub to provision infrastructure and to deploy charms. Next to a deployed charm there is always a Juju agent which periodically checks its internal state against the Juju controller and executes the deployed charm accordingly to install, configure, and otherwise manage applications.
Anything you provision or deploy and operate with a Juju controller goes onto a workspace called a ‘model’. Let’s create the model that will hold our chat applications:
ubuntu@my-juju-vm:~$ Added 'my-chat-model' model on microk8s/localhost with credential 'microk8s' for user 'admin'
This will automatically also switch you to that model.
Now, let’s deploy, configure, and integrate the charmed applications that will make up our chat service:
First, Mattermost:
ubuntu@my-juju-vm:~$ Deployed "mattermost-k8s" from charm-hub charm "mattermost-k8s", revision ... in channel latest/stable on ubuntu@.../stable
Now, its dependencies. Mattermost needs a PostgreSQL database, and its charmed version supports an easy way to integrate with such a database. Let’s deploy the PostgreSQL charm for Kubernetes in the recommended way, from track 14 with risk stable; with --trust – i.e., permission to use our cloud credentials (this charm needs to create and manage some Kubernetes resources); because we’re just playing around, setting the profile config to testing, so we don’t use too many resources; and, just for fun, with -n 2, that is, two replicas (in a real life setting you’ll want to distribute them over multiple nodes – something Juju would do automatically here too, except we’re doing everything on a single node).
ubuntu@my-juju-vm:~$ Deployed "postgresql-k8s" from charm-hub charm "postgresql-k8s", revision ... in channel 14/stable on ubuntu@.../stable
Mattermost wants PostgreSQL status to be TLS-encrypted. There are a few ways to do that. Because we’re just trying things out, we can use Self Signed X.509 Certificates (don’t do this in production!). Let’s deploy it and integrate it with our PostgreSQL to enable TLS encryption on our PostgreSQL cluster:
ubuntu@my-juju-vm:~$ Deployed "self-signed-certificates" from charm-hub charm "self-signed-certificates", revision ... in channel 1/stable on ubuntu@.../stable
Since postgresql-k8s and self-signed-certificates could be integrated over either the tls-certificates interface or the certificate_transfer interface, we’ll need to specify the endpoints explicitly when integrating:
ubuntu@my-juju-vm:~$ Finally, time to integrate Postgresql with Mattermost:
ubuntu@my-juju-vm:~$ While executing any of these commands returns automatically so you can execute the next, standing things up in the cloud takes a little bit of time; watch your progress with watch -n 1 --color juju status --relations --color. Things are all set when the output looks similar to the one below:
ubuntu@my-juju-vm:~$ Model Controller Cloud/Region Version SLA Timestamp
my-chat-model my-first-juju-controller microk8s/localhost ... unsupported ...
App Version Status Scale Charm Channel Rev Address Exposed Message
mattermost-k8s ... active 1 mattermost-k8s latest/stable ... 10.152.183.144 no
postgresql-k8s ... active 2 postgresql-k8s 14/stable ... 10.152.183.184 no
self-signed-certificates ... active 1 self-signed-certificates 1/stable ... 10.152.183.160 no
Unit Workload Agent Address Ports Message
mattermost-k8s/0* active idle 10.1.32.142 8065/TCP
postgresql-k8s/0* active idle 10.1.32.139 Primary
postgresql-k8s/1 active idle 10.1.32.140
self-signed-certificates/0* active idle 10.1.32.141
Integration provider Requirer Interface Type Message
postgresql-k8s:database-peers postgresql-k8s:database-peers postgresql_peers peer
postgresql-k8s:db mattermost-k8s:db pgsql regular
postgresql-k8s:restart postgresql-k8s:restart rolling_op peer
postgresql-k8s:upgrade postgresql-k8s:upgrade upgrade peer
self-signed-certificates:certificates postgresql-k8s:certificates tls-certificates regular
Time to test the results! From the output of juju status> Unit > mattermost-k8s/0, retrieve the IP address and the port and feed them to curl on the template curl <IP address>:<port number>/api/v4/system/ping. Given the IP we got above:
ubuntu@my-juju-vm:~$ {"ActiveSearchBackend":"database","AndroidLatestVersion":"","AndroidMinVersion":"","IosLatestVersion":"","IosMinVersion":"","status":"OK"}
Congratulations, your chat service is up and running!
At this point you can keep your current Juju setup to experiment further or proceed to the next section to tear things down.
Tear everything down
Tip
To tear everything down in one step, skip to the step where you delete your Multipass VM and uninstall Multipass.
Tear down your Juju deployment:
ubuntu@my-juju-vm:~$ WARNING This command will destroy the "my-chat-model" model and affect the following resources. It cannot be stopped.
- 3 applications will be removed
- application list: "mattermost-k8s" "postgresql-k8s" "self-signed-certificates"
- 2 filesystems and 2 volumes will be destroyed
To continue, enter the name of the model to be unregistered: my-chat-model
Destroying model
Waiting for model to be removed, 3 application(s), 2 volume(s), 2 filesystems(s)..........
Waiting for model to be removed, 3 application(s), 2 volume(s), 1 filesystems(s).....
Waiting for model to be removed, 3 application(s), 2 volume(s).....
Waiting for model to be removed, 3 application(s), 1 volume(s)...
Waiting for model to be removed, 2 application(s).....
Waiting for model to be removed, 1 application(s)............
Waiting for model to be removed........
Model destroyed.
ubuntu@my-juju-vm:~$ WARNING This command will destroy the "my-first-juju-controller" controller and all its resources
To continue, enter the name of the controller to be unregistered: my-first-juju-controller
Destroying controller
Waiting for model resources to be reclaimed
All models reclaimed, cleaning up controller machines
ubuntu@my-juju-vm:~$ juju removed
ubuntu@my-juju-vm:~$ Disabling all addons
Disabling addon : core/cert-manager
Disabling addon : core/cis-hardening
Disabling addon : core/dashboard
Disabling addon : core/dns
Disabling addon : core/helm
Disabling addon : core/helm3
Disabling addon : core/host-access
Disabling addon : core/hostpath-storage
Disabling addon : core/ingress
Disabling addon : core/mayastor
Disabling addon : core/metallb
Disabling addon : core/metrics-server
Disabling addon : core/minio
Disabling addon : core/observability
Disabling addon : core/prometheus
Disabling addon : core/rbac
Disabling addon : core/registry
Disabling addon : core/rook-ceph
Disabling addon : core/storage
All addons are disabled.
Deleting the CNI
Cleaning resources in namespace default
Cleaning resources in namespace kube-node-lease
Cleaning resources in namespace kube-public
Cleaning resources in namespace kube-system
Removing CRDs
Removing PriorityClasses
Removing StorageClasses
Restarting cluster
Setting up the CNI
ubuntu@my-juju-vm:~$ microk8s removed
ubuntu@my-juju-vm:~$ Removing user ubuntu from group snap_microk8s
Now exit the VM (in your terminal type exit); then, from your host machine, delete the VM:
~$ ~$ No instances found.
Finally, uninstall Multipass.