Marco Ceppi
on 6 October 2017

Recently /u/Elezium asked the following question on Reddit: Tools to deploy k8s on-premise on top of Ubuntu. This is a question that a lot of people have answered using a combination of MAAS/VMWare/OpenStack for on premise multi-node Kubernetes. If you’re looking for something with more than a two or three machines, those resources are bountiful.
However, the question came to “How do I do Kubernetes on an existing Ubuntu VM”. This is different from LXD, which is typically a good solution — though without a bunch of networking modifications it won’t be reachable from outside that VM.
So, how do you make a single — or even small handful — of VMs run Kubernetes in a production fashion? You could do it all by hand, but we’re well beyond the point where doing things from scratch in a non-repeatable fashion is reasonable, let alone desireable.
First, get two VMs. This is probably the easiest thing, I’m going to use a simple VM running the latest 16.04 Ubuntu Server — though you could use the Desktop or Cloud flavor of Ubuntu. I’ll also be doing these steps from a Mac terminal, but you could do this from an Ubuntu or Windows machine the steps are the same.
Once you have two VMs running with at least 1 core and 1 GB RAM (ideally 2 core and 2 GB RAM each) you’ll need to make sure you have a few things set. First, make sure you can connect to the two VMs over SSH. This is important as the tools we’ll be using are for remote setups.
From your host machine verify you can connect to the IP address of your VM. In my setup, this IP addresses are 172.16.94.129 and 172.16.94.130. Make sure you replace this with the address for your machine.
ssh ubuntu@172.16.94.129
ssh ubuntu@172.16.94.130
If you created a different user, switch ubuntu with that username. You should get a successful connection and may be prompted for a password. Now that you have successfully connected, close this connection by typing exit this will return you to your host machine and we can continue!
If you haven’t already, make sure you have conjure-up installed on your machine. In short, that’s either going to be brew install conjure-up or snap install conjure-up for MacOS and Linux respectively. To verify everything worked issue the following two commands:
conjure-up --version
juju version
The output should be equal to or greater than 2.2 for both conjure-up and juju.
Now we’re going to bootstrap Juju, creating a controller for which we can deploy software to. Normally, this is when you’d just run conjure-up kubernetes but since we’re working in such a unique case — deploying scale out software into a single machine — we’re going to do a lot of the steps conjure-up does, only manually.
To do this, we need to know the IP address of the VM and the username for a sudo user on that machine. Again the user is typically ubuntu and the IP address is from earlier.
juju bootstrap manual/ubuntu@172.16.94.129 marcos-blog
You may get prompted several times for a password, which are all passwords for your VM user.
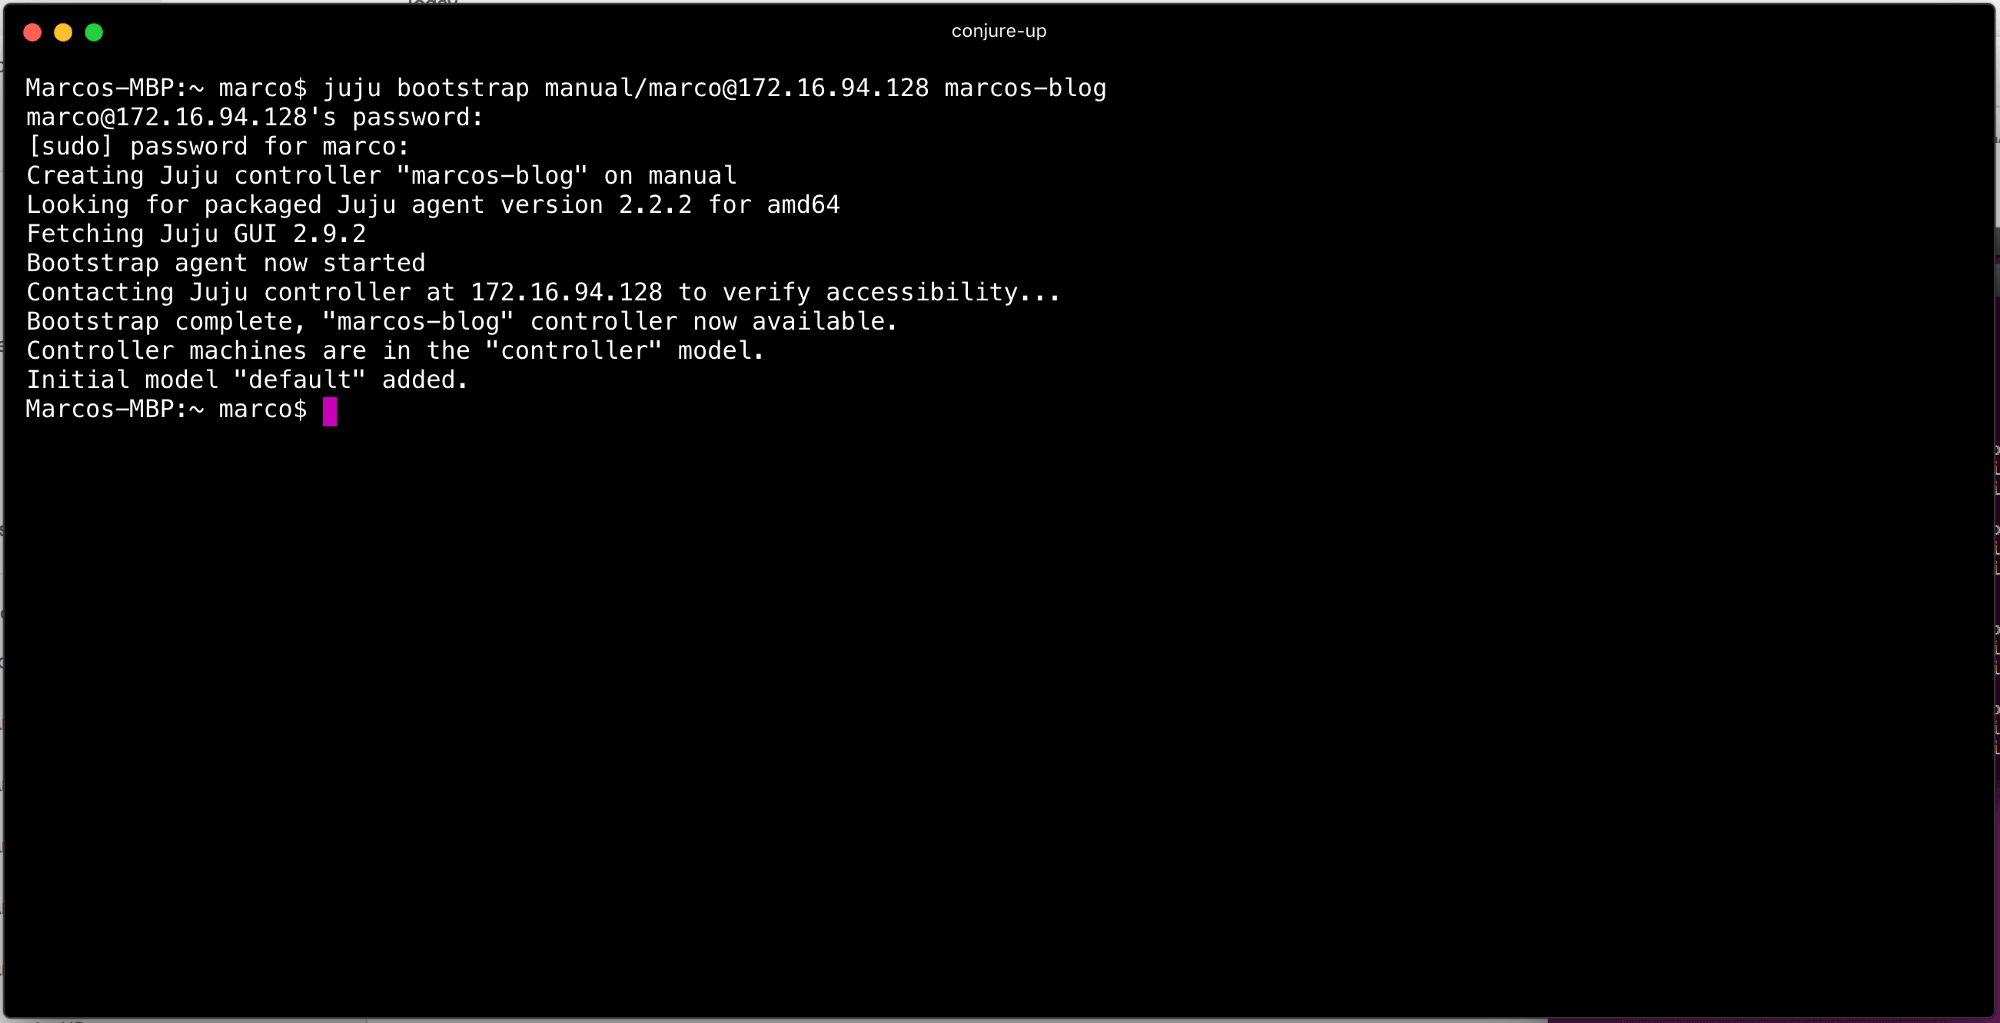
Once the bootstrap is complete, issue a juju status to verify that you have an empty model. This is an abbreviated instruction for manual bootstrapping, a lot more details are available in the full Juju documentation.
Juju uses models like namespaces for deployment. If you notice when you issue a juju status the default model name is default and there are no machines, applications, or units deployed. However, there is a machine because we used it for bootstrapping. We are tip-toeing into dangerous territory as you shouldn’t use the controller (the machine we bootstrapped) to deploy software. However, that means we would need more VMs!
If you can create more VMs, I’d suggest adding another machine to this deployment and avoid doing this switch to the controller. To do this, skip this step and continue below. If you only have/want two VMs, continue with this step.
If you issue juju models you’ll notice there is a controller model in addition to the default model. If we switch to that model, juju switch controller and issue another juju status you’ll see that there are no applications, no units, but one machine — and it’s our VM from earlier!

Now that we have a model with a machine we can get to work. What we’re going to do is manually place a few components, then let the process take care of the rest!
We’ll need to add our other VMs. During this step you can add as many VMs as you’d like, the process is the same. In the following sections I’ll address how to scale out the components beyond this very small deployment.
In order to do so, we’ll need to add the other machines so Juju knows where we want to put our components. To do this, run the following command for each additional machine we’ve not yet told Juju about:
juju add-machine ssh:<user>@<ip>
As with before, replace <user> and <ip> with the proper values from your setup.
Run juju status to verify you have all machines added and registered.

Kubernetes is comprised of a handful of components: etcd, easyrsa, kubernetes-master, kubernetes-worker, and flannel. When you complete a deployment of Kubernetes using conjure-up these components are installed, configured, and connected for you. Conjure-up uses Juju as the driver for these instructions and we’re doing this “manual” deployment manually with the Juju pieces directly.
First, we need to deploy EasyRSA and ETCD onto the machine. However, we don’t want to just smash them together, we’ll use LXD to separate and isolate these components.
juju deploy ~containers/easyrsa --to lxd:0
juju deploy ~containers/etcd --to 0
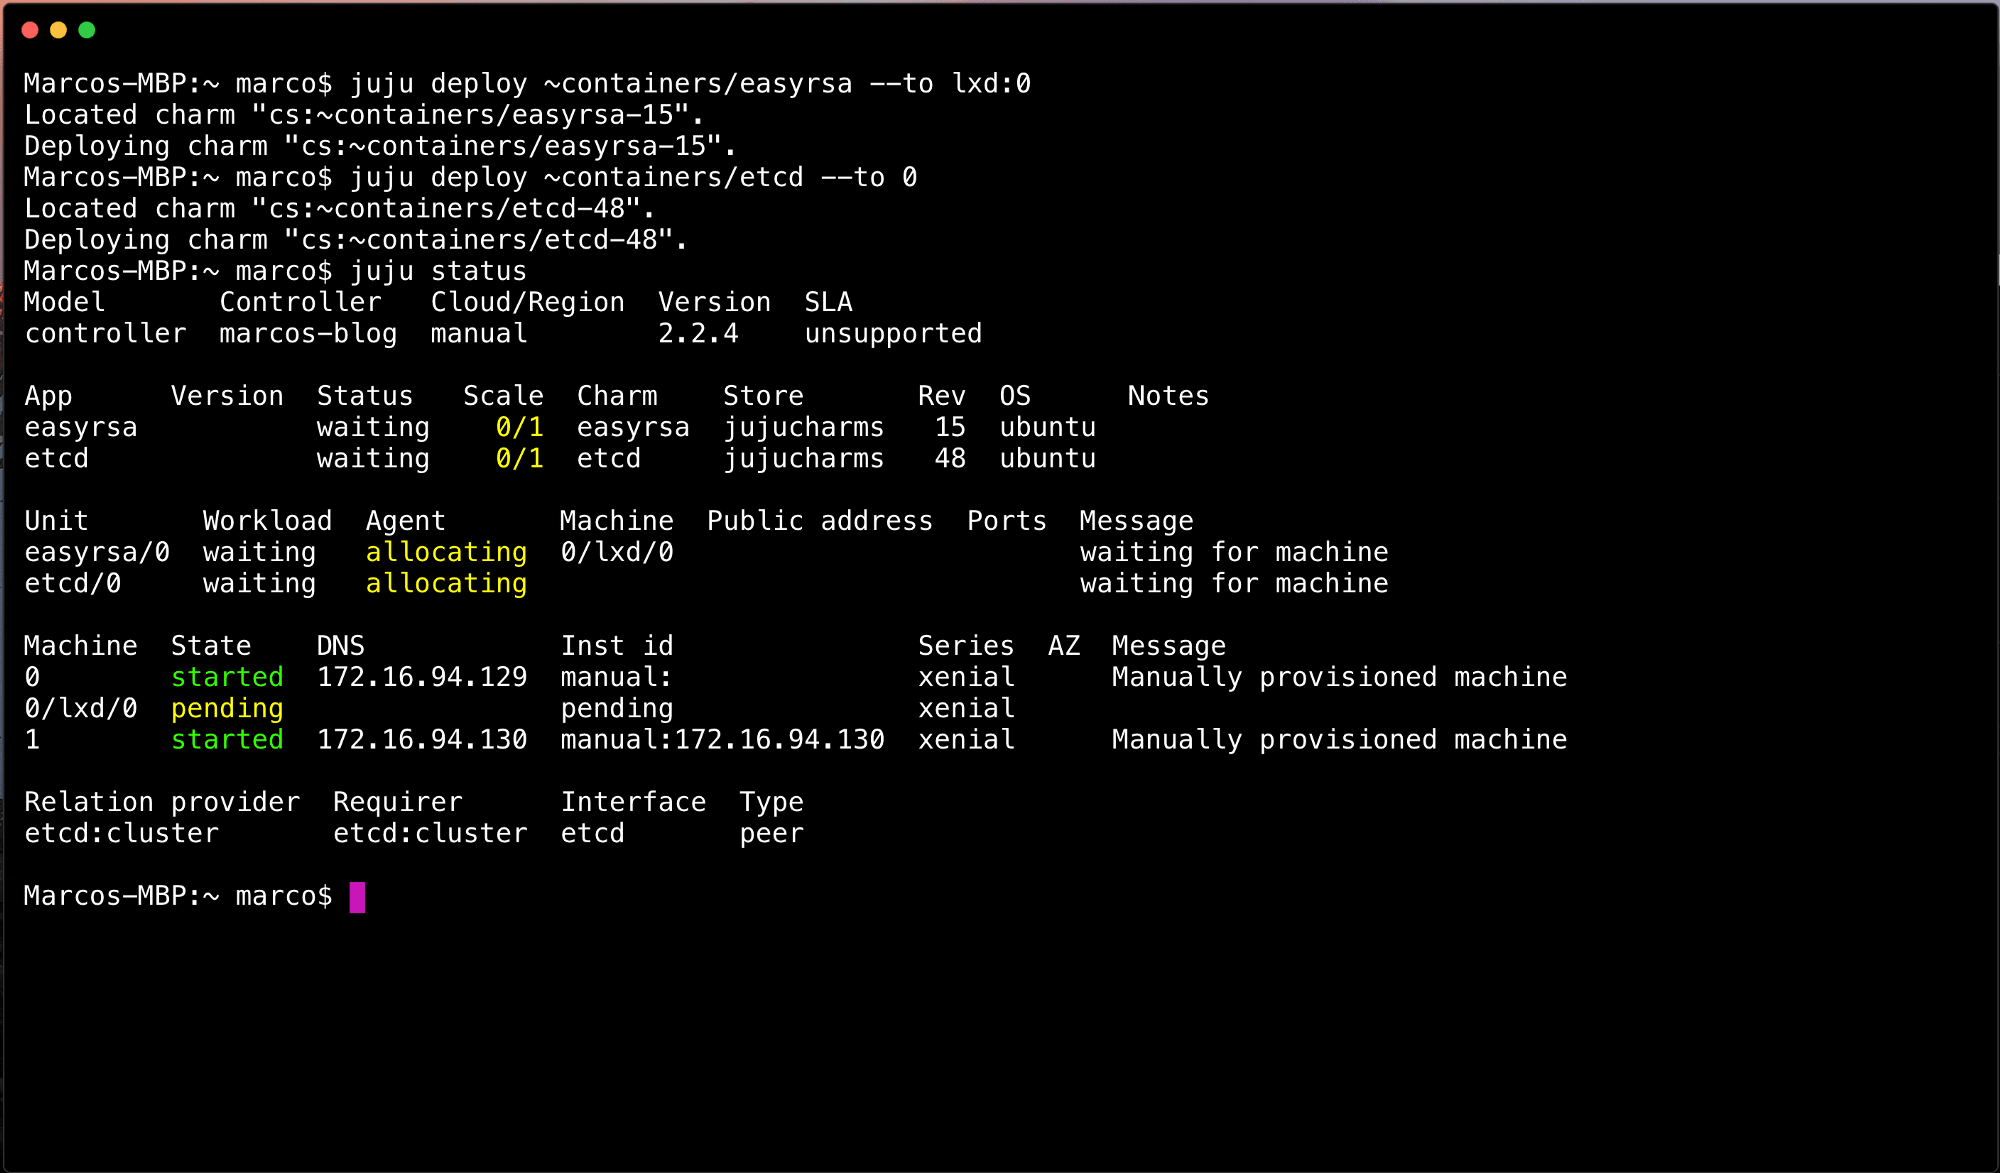
Depending on your networking, this will take a few moments to create LXC machines and setup the software. Eventually you’ll end up with a state where etcd is blocked. You don’t need to wait for this to complete before issuing the following commands:
juju deploy ~containers/kubernetes-master --to 0
juju deploy ~containers/kubernetes-worker --to 1
This will combine these two components on the single machine. We’re not going to use LXD for these components since it won’t be routable from outside the VM without messing with the network configuration. As such, we’re deploying --to machine 0, the components will be directly accessible through the VMs IP address.
After a few moments, you’ll find something like the following in juju status

As you can see, there’s still items executing. We could wait for these to complete, but if you’re as impatient as I am, then be thankful we live in an asynchronous world and press forward! The final step is to glue all these components together (and deploy the SDN). To do that, we’ll take the kubernetes-core bundle, which is a super light weight Kubernetes cluster, and deploy that now. It’ll skip over any component you’ve already deployed, add any components not yet deployed, and execute all the required relationships.
juju deploy kubernetes-core
The output for this is pretty verbose, and should look something like the following:

This is to be expected. We see in several places Juju skips over components we’ve already deployed, adds things (flannel) that we’re missing, and finally adds all the relations for these components. This is how we resolve the etcd “blocked” message that it’s missing a certificate authority. You’ll notice that etcd:certificates is connected to easyrsa:client which will provider certs for etcd!
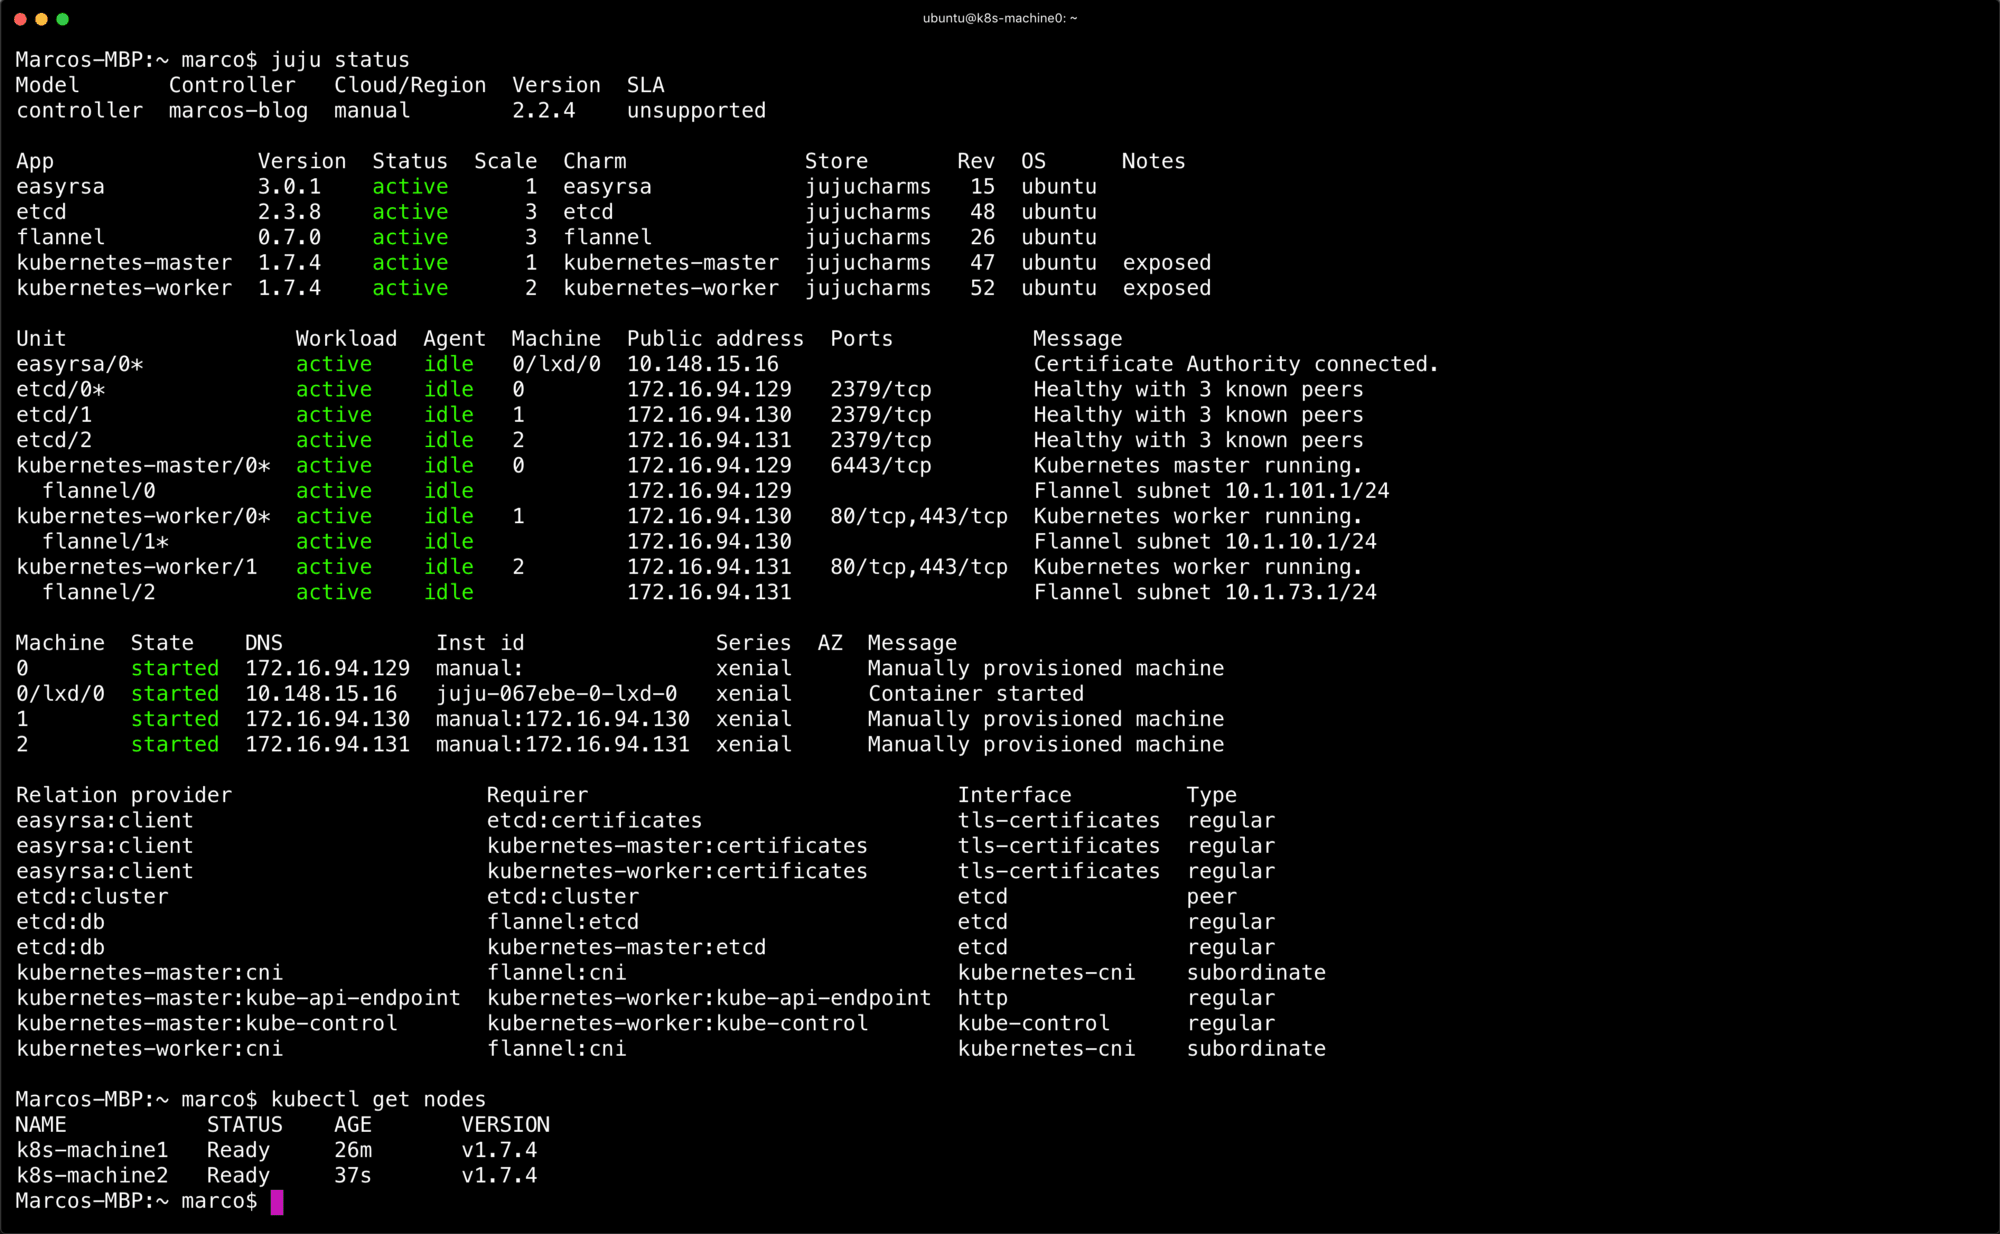
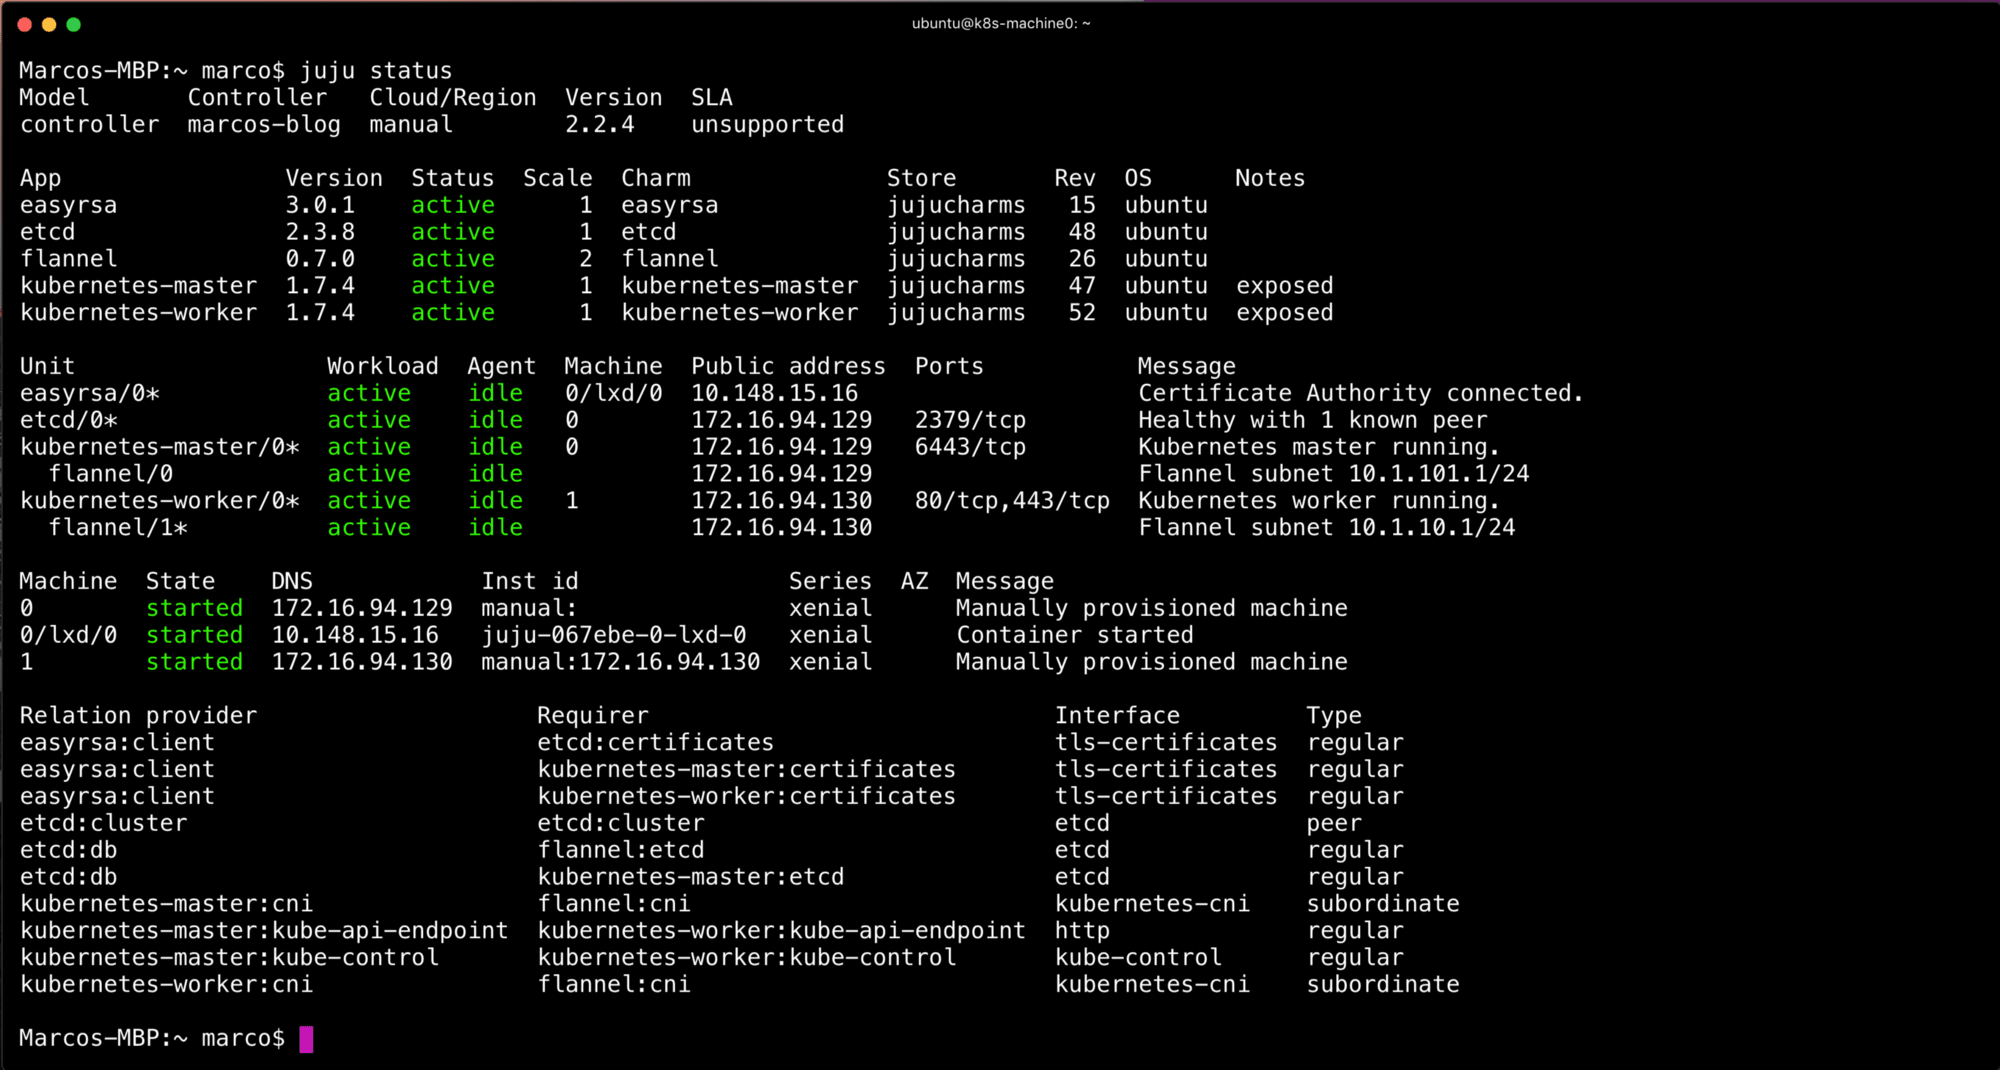
Eventually, after running juju status for a few mins you should end up with the following. A completely deployed Kubernetes cluster.
From this point forward, we’ll need to get the credentials for the cluster. This is done automatically for you with conjure-up. With this method you’ll just need to issue the following
juju scp kubernetes-master/0:config ~/.kube/config
If you already have a Kubernetes config file, choose another path, like ~/.kube/config.cdk and make sure you use export KUBECONFIG=$HOME/.kube/config.cdk to use the new configuration file.

For the final touch, I wanted to show how to scale this up. Ideally, you’d want to use a public cloud, private cloud (VMWare, OpenStack), or MAAS for bare metal. The manual provider is just that — very manual. That said, if you have more VMs you can add them and scale the applications to spread across them. I’m going to add another machine and use it for both etcd and kubernetes-worker.
juju add-machine ssh:ubuntu@172.16.94.131
juju add-unit -n2 etcd --to 1,2
juju add-unit etcd --to 2
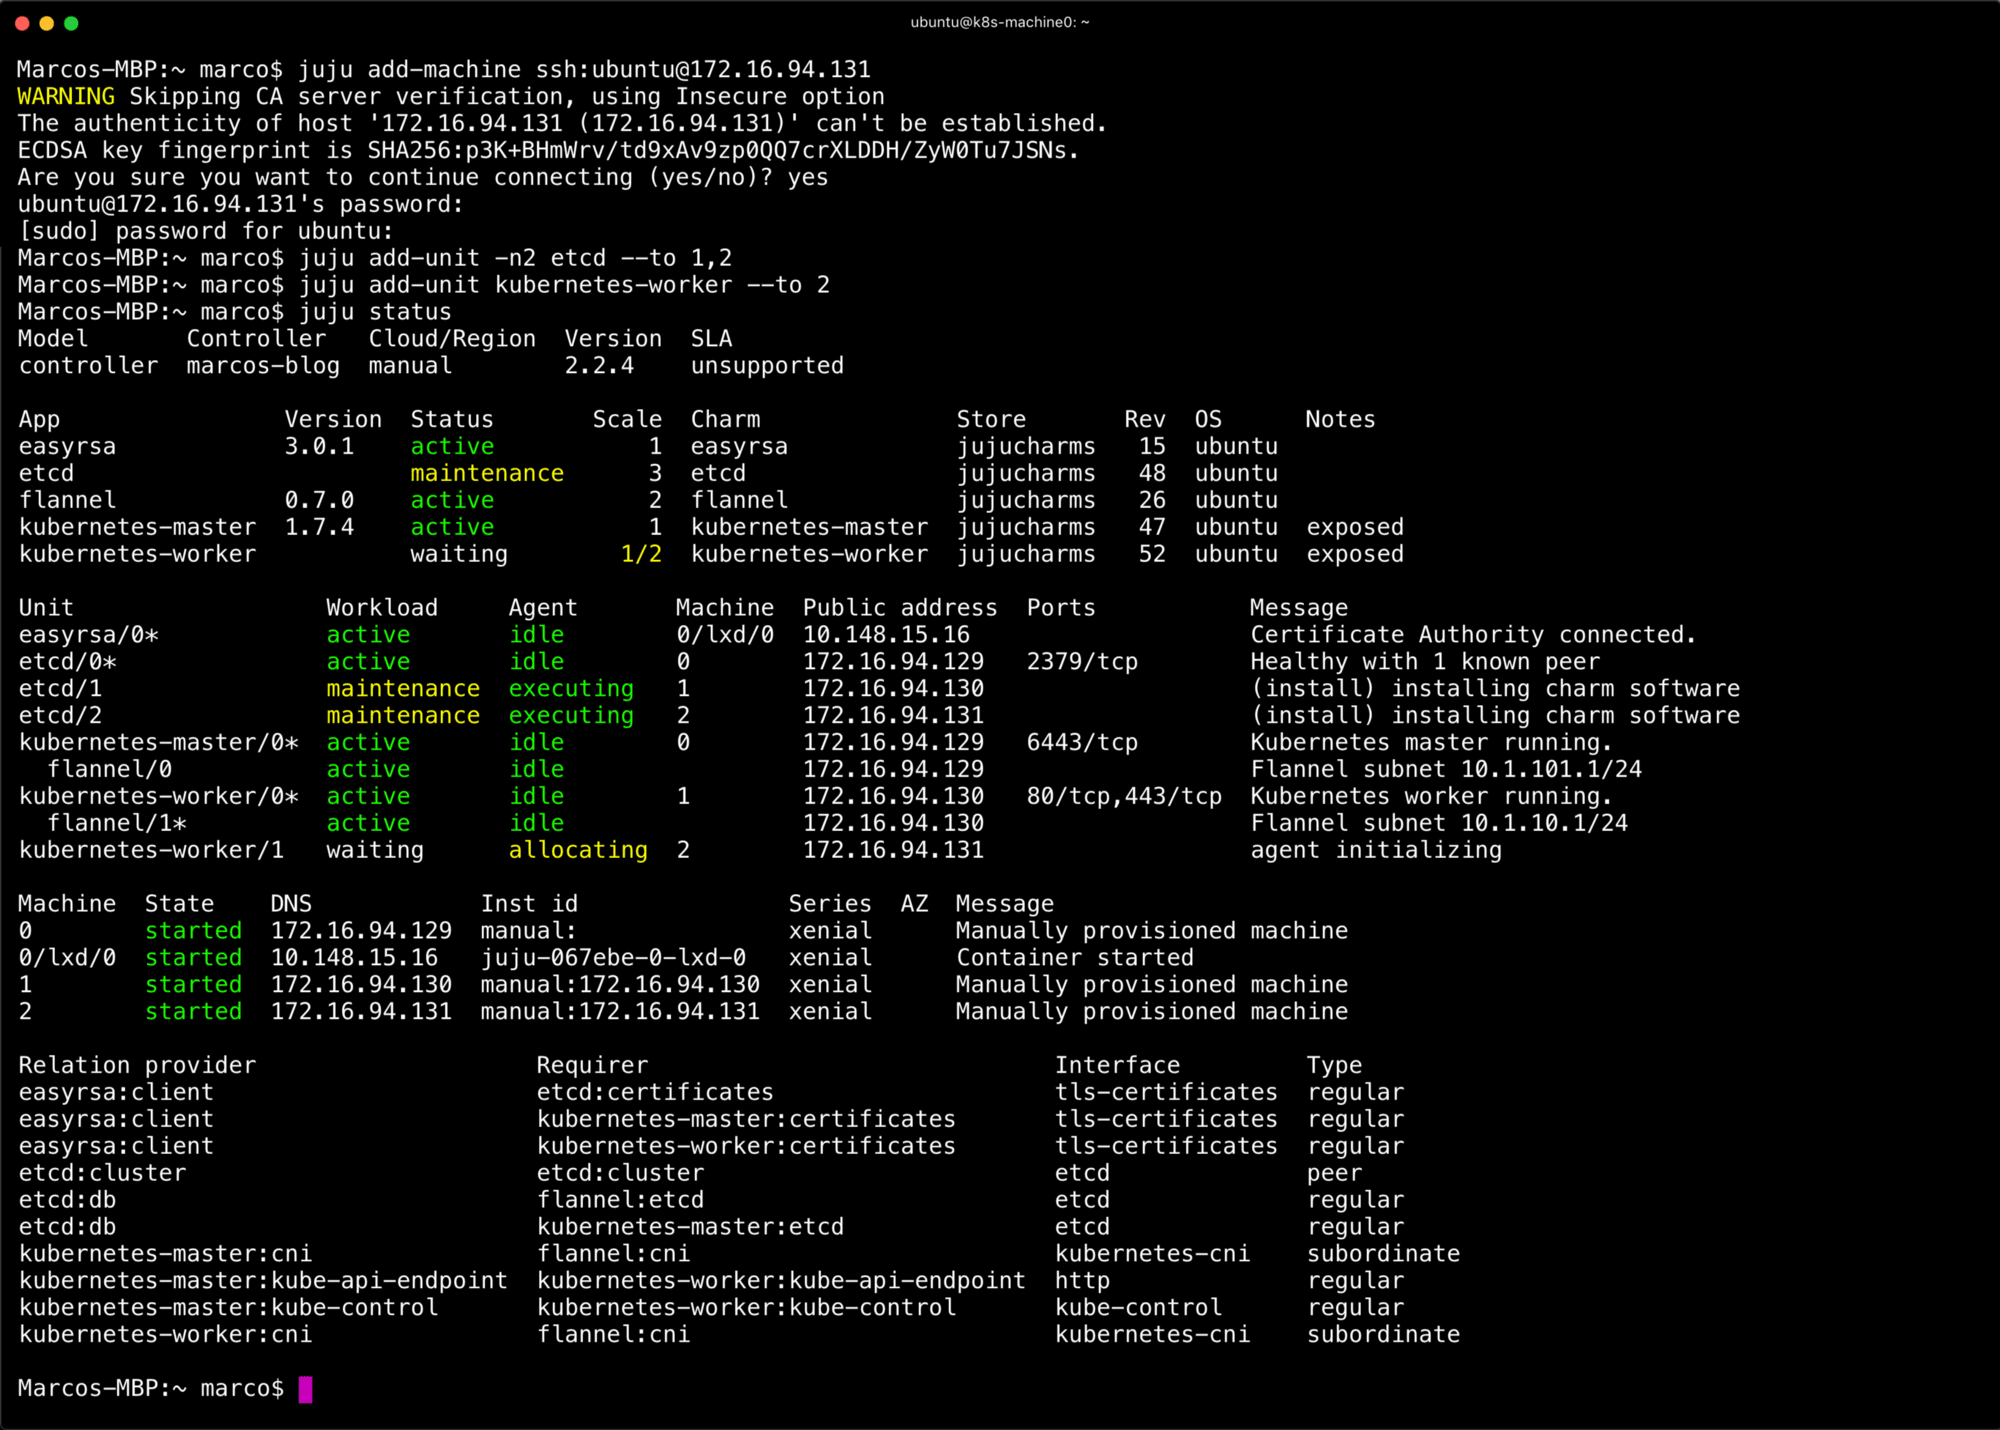
The result will be a three node etcd and two nodes for Kubernetes workloads. Again, juju status will show you the status of the cluster at anytime. Eventually everything will converge on active and idle. Once this is done you’ve scaled out the deployment. From here you can continue to add VMs, redeploy everything again, or actually start using Kubernetes!