Canonical
on 3 February 2026
We recently announced that you can now benefit from the combined power of Ubuntu Core and AWS IoT Greengrass to bring the computation, storage, and AI capabilities of the cloud closer to the edge. AWS IoT Greengrass is an open source edge runtime and cloud service that extends Amazon Web Services (AWS) capabilities to physical devices. It means devices can act locally on data while still harnessing the cloud for management and analytics. This is essential for applications where latency can be critical, resilience is needed due to low or no network connectivity, or where privacy and data concerns are paramount.
Ubuntu Core is a flavor of Ubuntu that has been specially optimized for IoT and embedded systems. The combination of the Ubuntu Core and AWS IoT Greengrass is ideal for those looking for reduced latency, lower bandwidth, and more efficient data processing.
This tutorial helps you get started using an Ubuntu Core device as a platform to deploy an AWS Greengrass based demonstration of video inference. To follow along you will need two devices:
- An intel-based device, such as a NUC, for running Ubuntu Core
- A device for configuring your AWS deployment and running the dashboard to show you the results.
You will also need a webcam to capture images and an AWS account.
Both AWS and Ubuntu Core are available on a wide range of hardware platforms. However, this specific demo has been optimized for Intel – hence the device requirements.
This blog will begin with a brief explanation of the solution before providing an overview of the architecture, and then guide you through the following steps:
- Installing Ubuntu Core
- Creating an AWS user account for the demo
- Installing the Greengrass Snap package and connecting to your AWS account
- Preparing your deployment environment
- Creating and deploying Greengrass Components
- Setting up a web interface to view the demo outputs
So, let’s get started.
Solution summary
The solution uses Greengrass Nucleus installed as a Snap package on Ubuntu Core. It uses the strict confinement for snap packages to help maintain the highest level of security control and isolation.
Installing and configuring the Greengrass snap package takes only a couple of minutes. The package enables easy connection of Greengrass to the AWS Greengrass Service in your AWS account, including creation of the necessary certificate and permissions needed for the device to function.
After installation and configuration, three Greengrass custom components are deployed to the device from AWS. These enable connection of a USB webcam for capturing local images. Using Computer Vision (CV) capabilities provided through Intel OpenVINO, these images can then be processed for object detection to create a high-performance power combination for local device inference.
The results of the CV inference are sent to AWS Cloud IoT Core service using MQTT, a standard protocol for IoT devices. The annotated images with bounding boxes for object detection are uploaded to Amazon S3 from the device. Together, these enable a web-based dashboard to visualize annotated images and inference results.
High-level architecture and overview
The diagram below shows the high-level view of the interaction of the different components that will be deployed to your device for the purposes of this demo.
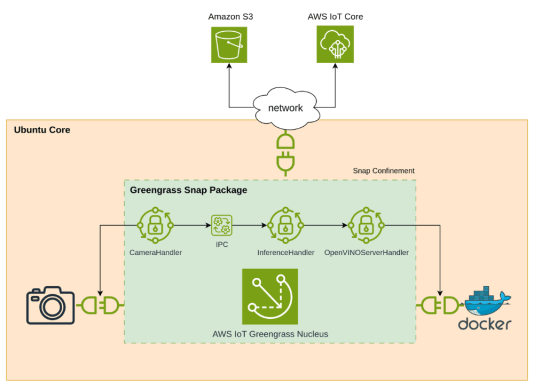
The three components we will be deploying are:
- CameraHandler
- Manages the connection to the USB webcam.
- Captures an image from the webcam every 30 seconds.
- Stores the image locally (within the confinement of Greengrass snap package).
- Publishes a message using Greengrass IPC on the camera/images topic with the path to the locally stored image file.
- InferenceHandler
- Subscribes to the camera/images topic.
- When it receives a message on that topic it processes the image so that it can be sent to OpenVINO for inference.
- Calls the OpenVINO Model Server container to carry out the inference.
- Upon receiving the inference results it annotates the image with bounding boxes and uploads the annotated image to Amazon S3.
- Sends a MQTT message to AWS IoT Core on the topic camera/inference.
- Deletes the local images.
- OpenVINOServerHandler
- Downloads the relevant Computer Vision ML model from Amazon S3.
- Runs the standard Docker image for OpenVINO Model Server for inference using the provided ML model.
Requirements
The minimum requirements for edge devices running Ubuntu Core is available in our documentation. While Ubuntu Core is available for many architectures, this demo is targeted at Intel CPUs because it uses the Intel OpenVINO driver, and we will need:
- 512MB RAM
- 1GB storage
- 2 x USB ports
- Internet connection (wifi or cabled)
We will also need:
- 2 USB memory sticks (min: 8GB)
- USB webcam
- Deployment device
- A laptop/desktop for creating the deployment and running the dashboard
1. Installing Ubuntu Core
First, we need to set up our Ubuntu Core device.
Ubuntu Core is a minimal, immutable flavor of Ubuntu which provides a reliable and secure platform for connected devices. To get started with it, Canonical have provided reference images that can be flashed onto certain devices and provide you a working environment.
Ubuntu Core’s immutability and automatic updates make it the perfect platform for an embedded IoT workloading, meaning the user won’t have to worry about the device breaking in the field.
Once we have flashed the Ubuntu Core image to our device, we will need to be able to connect to it. This will require an Ubuntu SSO account and an SSH keypair. You can skip this step if you already have an account, otherwise you can sign up for one here.
To authenticate yourself when trying to connect to your Ubuntu Core device, you will need to upload a public SSH key to your SSO account. This will then be automatically downloaded to the Core device during initial configuration and allow you to log into a console.
To generate and upload an SSH key pair, follow the steps detailed in our documentation: Connect to Ubuntu Core with SSH.
Now, we are ready to set up the device.
We will be booting the device into a live Ubuntu environment using the first of our two USB sticks. From this instance, we can then flash the device storage with the Ubuntu Core image that we copied onto the second USB memory stick.
- Follow this tutorial to create a bootable USB stick with Ubuntu Desktop
- Download the reference Ubuntu Core 24 image for AMD/Intel 64bit devices
- Boot your device into Ubuntu Desktop using your first USB stick.
Once in Ubuntu Desktop, insert your second USB stick and locate the Ubuntu Core image file. This will be something like:
/media/ubuntu/<disk-label>/ubuntu-core-24-amd64.img.xz
Let’s decompress that file to give us a raw image:
unxz ubuntu-core-24-amd-64.img.xzNow, flash it to the device:
dd if=ubuntu-core-24-amd-64.img of=/dev/<target disk> bs=32M status=progressIf you are not sure what your local target disk is, run sudo fdisk -l. This will list all your storage devices. You are looking for something like /dev/nvme01n1. Note, this will completely erase anything on your target device, and replace it with Ubuntu Core.
Once complete, you can remove all your USB sticks and reboot the device, which should start the Ubuntu Core initial configuration.
Follow this wizard process and configure your network connection. You will be prompted to enter your Ubuntu SSO credentials, which will automatically download your SSH Keys to the device.
Once configured, your device will be up and running. On screen, there will be a message explaining how to connect to this device from any other device on the network with a command such as:
ssh <ubuntu SSO user name>@<device IP address>
Congratulations. You now have a secure, robust Ubuntu Core device. Now, let’s give it some cloud-connected superpowers.
2. Creating AWS IAM Users
To create and deploy the AWS components for this demo, we need to create two IAM users with programmatic access (Access Key and Secret Access Key) for Greengrass installation.
To set up an IAM User:
- Go to your AWS account access portal.
- Search for the IAM service.
- From the Access Management sidebar, select Users and then create a user.
- Pick a name for this user. When prompted for permissions, select “Attach Policies Directly”.
- Select the policies detailed for each user below.
Greengrass device user:
The first user is for installing the Greengrass device – we’ll refer to them as the “Greengrass Device User” from now on. It is recommended to give this user AWSGreengrassFullAccess and AWSIoTFullAccess permissions – this is slightly more than is required, but will ensure the user has everything necessary to get started. A finer grained breakdown of AWS permissions used can be found in the component repository.
When creating this user, make sure you create and download the Access Keys as you will be prompted to enter them during the Greengrass installation.
Deployment user:
The second user is needed to configure the deployment and resources – we’ll call them the “Deployment User” from now on. This user will require a few more permissions. This user should be granted the PowerUserAccess and IAMFullAccess policies in addition to the AWSIoTFullAccess and AWSGreengrassFullAccess policies.
Obtain Access Keys for users:
Having created both the Greengrass Device User and the Deployment User we need to obtain their access key.
- Select a user from your list and look for the Access Keys section.
- Click “Create Access Key.’
- Select AWS CLI. Create the Keys and make sure to save a copy of them.
We will use the access keys during the following steps to configure the device and deployment.
3. Setting Up AWS on your Ubuntu Core device
The installation of Greengrass is simple and quick, following the steps below on your Ubuntu Core device.
- Install the aws-iot-greengrass snap from the store (for more information, visit our webpage) and run the configuration command:
sudo snap install aws-iot-greengrass

sudo aws-iot-greengrass.configure
- When prompted, enter the IAM user Access Key and Secret Access Key for your Greengrass device user. Make sure to specify the AWS region that you are using and the name you want for the device in the AWS IoT Core portal.
- Monitor the log messages on the screen to ensure successful configuration.
- Check your AWS account to ensure that you can see the device listed as an “IoT Thing” and as a “Greengrass Core Device”.
- Make sure the necessary interfaces are connected to allow the Greengrass snap to interact with the device and webcam by running the following commands:
sudo snap connect aws-iot-greengrass:docker docker:docker-daemon
sudo snap connect aws-iot-greengrass:docker-executables docker:docker-executables
sudo snap connect aws-iot-greengrass:camera
4. Preparing your deployment environment
Having created our device, we now will create some components and deploy them to the device. Let’s start by setting up the environment for this on your second Ubuntu device.
The components themselves and scripts to help make the installation process simple are available on GitHub. Start by cloning this repo to your local device:
sudo apt install git
git clone
https://github.com/aws-samples/sample-greengrass-ubuntucore-computervision
Next, we will need to install and configure the AWS CLI. This will allow us to log in to AWS and perform all the necessary actions. The login command will prompt you for the Access Key and Secret Access Key created in the previous steps – in this case, use the ones for the Deployment User.
snap install aws-cli --classic

aws configure
Now we are logged in, we can create our components. As mentioned, the component uses the Intel OpenVINO models for image analysis. These need downloading separately using the provided script in the repository:
sudo apt install curl zip
download_model.sh
Finally, we’ll make sure we have all other dependencies installed and create a python virtual environment to keep everything together. From the local repository directory, run:
sudo apt install python3-venv
python3 -m venv greengrass-deploy
source greengrass-deploy/bin/activate
pip install -r requirements-deploy.txt
5. Creating and deploying components
Before we can deploy the components to the device, we will create an S3 bucket to store our images and a user account so we can access the web dashboard we will create.
This is all handled by the following script.
python3 setup_aws_resources.py --s3-bucket your-bucket-name --region us-east-1The script will create:
- Greengrass Token Exchange Role and Role Alias (required for Greengrass components to access AWS services)
- S3 bucket (for component artifacts and the latest processed image)
- Cognito resources and a demo user (for React dashboard authentication)
- IoT policies and IAM roles
As the web dashboard will be accessing our AWS resources, we will need to create a user for that purpose that allows for username/password authentication. The user will be demo@example.com and you will be prompted for the password you would like to use.
Note: The InferenceHandlerCore component uploads each processed image to the same S3 location (camera/latest-inference.jpg), overwriting the previous image. This keeps storage minimal and simplifies the dashboard.
And now, it is time to deploy components by simply running the script and follow the prompts:
python3 deploy_greengrass_components.pyThis will guide you through the process including:
- create: Uploads component artifacts to S3 and creates Greengrass components in AWS
- deploy: Creates a deployment targeting your IoT Thing/Greengrass Core Device
Once the script has run, you should be able to see the status of your deployments and the components being delivered to your device.
If you need more information on the scripts, or debugging any issues, the repository contains a readme.md file with more details.
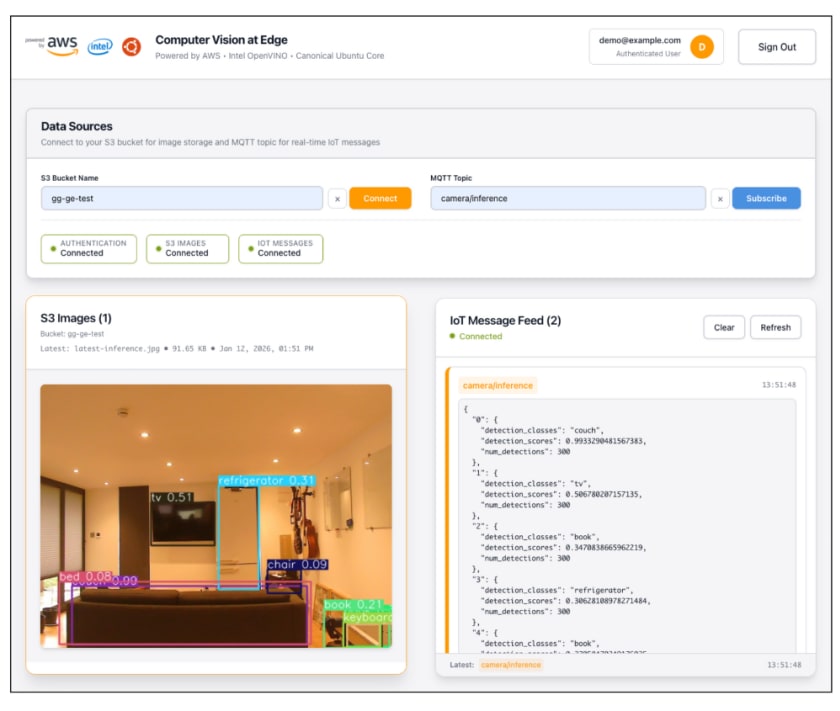
6. Setting up a web interface to view the results
So, the deployment has completed and our device is happily running away doing its own thing on the edge. We want to see what it is up to, so let’s deploy a dashboard. The dashboard runs locally, connecting to AWS to display the most recent captured image alongside the inference model output.
The dashboard is provided with the component repository and more information on it can be found in the /react-web folder.
Scripts have been provided below to perform all the necessary setup steps.
The configuration for the dashboard, to ensure it connects to the correct locations, is stored in the .env file that is automatically populated when you run the deploy_greengrass_components script. If you need to recreate it, you can run the script again with the following settings:
python3 deploy_greengrass_components.py --stage setup --s3-bucket
your-bucket-name --region us-east-1
Having configured everything, install the dependencies necessary for the dashboard. From the react-web/ folder in the repository, run:
apt install npm
npm install
Finally, start the dashboard server with:
npm startOpen http://localhost:3000 to view the dashboard. Log in with the demo user credentials created in the previous stage and click “Connect” to see the S3 images. Click “Subscribe” to view the model output.
Next steps
We hope that, having set up this demo, you get an insight into what you can do with AWS IoT Greengrass and Ubuntu Core. From here, you can further explore the options to build components, deploy, manage, and monitor remotely, as well as scaling up. In addition, Ubuntu Core will keep you secure and up to date automatically.
In future blogs, we will explore more specific Ubuntu Core management options directly from AWS Greengrass. Keep your eyes peeled!
What will you build next? A smart factory monitor? An automated sales kiosk? A robotic production line? Whatever it is, Ubuntu Core and AWS Greengrass have your back.
Whether you are a startup bringing your concept to market or already have large fleets of devices deployed in the field, we have the expertise and infrastructure to launch and support you. Contact our team here.