Igor Ljubuncic
on 11 April 2019
Make compelling videos with free software: Director’s Cut
Creating videos is easy. Creating great videos, not so much. A good production starts with an idea, but it also requires talent, time and tools. We cannot do much about the first two, but we sure can give you some nice ideas on the tools you want to make snappy videos.
Typically, a video production will have three phases: the collection of content in the form of raw footage, recordings, audio clips, and screenshots for thumbnails; the processing of these materials into a unified project, including some embellishments and effects like color correction and grading, noise cancellation, volume gain, and similar; finally, the project is rendered and packaged inside a video container like AVI or MKV that can then be shown or shared to your audience. At each of these steps, you want reliable software that can help you manipulate your footage in a fast, convenient way. We’ve got some recommendations.
Capture video: OBS Studio
This is a free and open-source software for video recording and live streaming. OBS Studio comes with many useful features. When you launch the program for the first time, you will have the option to run a configuration wizard, which lets you optimize your setup. You can select online streaming or focus on recording content locally. OBS Studio will also try to find the most optimal profile for your hardware, like 1920x1080p@60FPS. Once this step is complete, you can start working.
OBS Studio allows you to capture video from a range of AV sources, image slideshows, webcam and screen capture (including external game systems), individual application windows, files, and more. You can also create scenes and add various transition effects. For instance, if you’re creating new content for a video tutorial or a vlog session, this is a powerful, versatile tool for your project. OBS Studio uses hardware acceleration, so this will speed up any processing, and reduce CPU usage.

Capture and edit audio: Audacity
While OBS Studio allows you to capture audio streams, the main focus is on video. For audio-only content, you may want to consider Audacity, a multi-track audio editor and recorder. You can use the application to record live audio, edit sound files in many formats, including WAV, MP3, Ogg Vorbis, FLAC, and others, mix and splice sounds, and apply a wide range of effects (like pitch change, equalization, normalization, etc). In particular, it’s very useful in filtering noise from audio recordings, and removing extraneous seconds from the beginning and the end of sound files.

Cut and join videos: Vidcutter
Sometimes, you may have really large media files, like a recording of a wedding ceremony or a bicycle race, but you only need a tiny segment. Working with huge files can take excess time or system resources, and you want to be able to easily – and quickly – grab only the relevant parts. To this end, you want Vidcutter.
This program is a media cutter and joiner, with emphasis on speed. It uses a frame-accurate SmartCut technology, with Qt5, libmpv, FFmpeg and MediaInfo powering the backend. The actual manipulating is almost instantaneous, and this can really shave time (so yes, we can help there, too, the talent is still out of the question, I’m afraid) needed in the processing stage of your project.


Create and edit thumbnails: GIMP
Video productions may also include text and well as “still” frames (sections of video that look static to the human eye, not the still frames that compose every video). For example, you could add a banner for your website or closing credits, or you could go for mood slides akin to the 1920s silent movies. Or you may want to create thumbnails that will be shown to people before playback (like on Youtube, for instance). This begs a question: how do you create those?
A video segment that shows static text for say 5 seconds will typically mean 5 seconds worth of still frames of which the video is composed (e.g. 24 or 30 FPS). That does not mean you have to actually record your images (like screenshots) for however many seconds you expect them to be shown on the screen in the final render, or copy the images over dozens or hundreds of times. We will explain how to handle that shortly, but first, let’s focus on individual images.
GIMP is a free, open-source and cross-platform raster graphics editor, which can be used for image retouching and editing, free-format drawing, image format conversion, and more. GIMP supports layers, brushes, numerous effects and filters, scripting, and more, and it can be further customized through powerful third-party plugins.
It is very handy for making compelling art that you can embed in your projects. You can use it to make your photos or screenshots black & white or sepia, add noise or watermarks, create cartoon-like speech balloons, or design bright logos that draw the eye. Then, you can also resize images or create animated GIFs. This is really where your talent as an illustrator, graphic designer, photographer, or an enthusiastic hobbyist comes into play.

Putting things together: Shotcut
At this stage, you have your raw and edited video, audio and images, and you should be ready to assemble your project into what will eventually be the final render. ShotCut is a free, open source, cross-platform video editor, with support for a wide range of formats. You will not need to import files, which means you will be able to see your clips in “real-time” and perform native timeline editing. ShotCut also supports resolutions up to 4K.
Shotcut allows you to add audio and video clips as well as still images (like screenshots). You can then add them to one or more tracks in your project. You have the option to set arbitrary start and end markers to your added clips (instead of cutting them separately or using their default duration). For images, you can extend them to any length of time you like. This means that any image file automatically becomes a video file – you can add a thumbnail, set its length to say 5 seconds, and this could constitute the first few moments of your final cut.
Next, you can add various effects to your clips, including fade in, fade out, color correction, watermarks, audio delay, deinterlacing, compositing, rotation, speed, and many others. It can take a while getting everything right, but with the live preview option, you can quickly get a sense of what the output will look like, without any expensive processing. Once you’re happy, you can export (render) your project. This will include selecting the desired resolution, framerate, audio and video codecs, and the container format.

Embedded subtitles: VideoLAN (VLC)
VLC in a Jack o’ All Trades in the media world, and this free, open-source player comes with many advanced features that go beyond simple playback. The application lets you record local and network streams, transcode media files, add various effects, and even embed subtitles. ShotCut supports embedded subtitles, but if you only want to work with individual clips, and you don’t require the full processing power of a complete media suite, you can use VLC for this task.
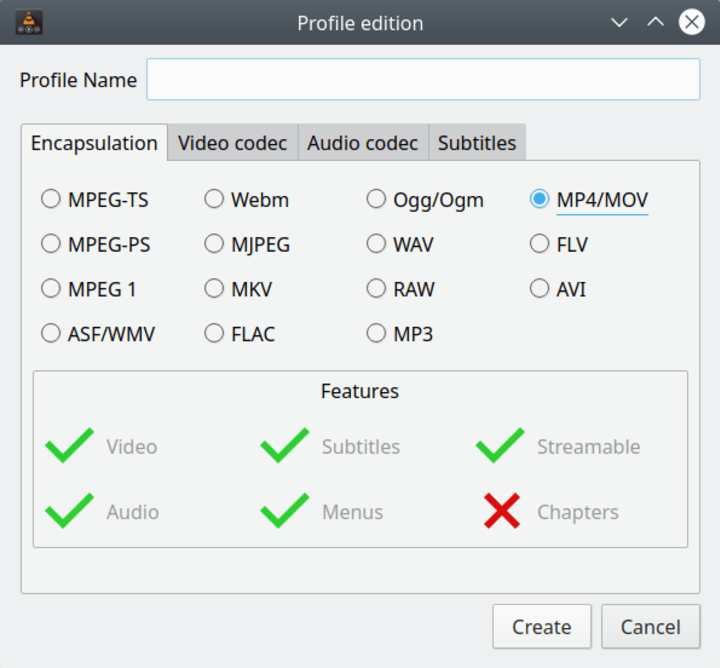
Under Media > Stream, you can select a source file, and then configure the destination (output). You will also have the option to transcode the stream, and there are multiple pre-made profiles available, including Video for Android, TV, Youtube, WEBM, MP4, TS, ASF, OGG, and many others, or you can create your own profile with your choice of the video and audio codecs. Not all profiles support subtitles, but many do.
You can then select the subtitles file (typically in srt or sub formats), and overlay them onto your steam. VLC will then run and process the stream, and your final cut will have embedded subtitles.


Now you may be wondering, how do you go about creating subtitles? It’s quite easy. In essence, subtitles are text files with time markers that indicate at what point a specific line of text should show and then disappear off the screen. A subtitle file will be something like:
1
00:00:10,000 --> 00:00:11,500
I wonder where that fish has gone?

2
00:00:13,600 --> 00:00:14,900
You loved it so, like a brother.

3
00:00:15,500 --> 00:00:17,200
And it went, wherever I did go.
If all else fails: ffmpeg
You’ve heard the saying: underneath it all, it’s Linux. When it comes to media manipulation and processing, underneath it all, in most cases, it will be ffmpeg. This command-line utility allows a range of operations on media files, including transcoding, basic editing in the form of trimming and concatenation, video scaling, some effects, and more, all powered by a bundle of audio and video libraries and codecs in the backend. Ffmpeg is extremely useful, quite often when you might yourself not making progress with other software. You can also use it in scripts for automated and batch processing. It also supports hardware-accelerated video encoding.
For example, you may want to transcode a MOV file to MP4, and also change the audio codec (also due to restrictions in what codecs are supported in different containers, as we’ve seen in the VLC subtitles example), but keep the original video codec. In this case, you would run something like:
ffmpeg -i MVI_2247.MOV -vcodec copy -acodec mp3 -b:a 192k edited.mp4
The -i flag specifies the input file, -vcodec is set to copy (stream) the video without any modifications, and we’re changing the audio to MP3 format and 192K bitrate. This is only a small, and seemingly trivial example, but it emphasizes the power and flexibility of ffmpeg and its usage.
Summary
Perhaps your first video production after reading this article won’t be Battleship Potemkin, but it could still be a reasonably elegant, well laid out content that people can enjoy, both on the content and composition levels. If you follow the guidelines laid out here (and also, don’t film vertically on your phone) and use the software recommendations, you should be able to provide useful, meaningful, maybe even entertaining videos to your audience.
Indeed, good tools can enhance your ability to work with ease and speed, and not get bogged down by technicalities. We believe this article outlines a very nice, friendly collection of applications for audio, video and image manipulation, throughout the entire sequence of a media project. If you have any suggestions or questions, please head over to our forum, and drop us a line or two.
Photo by Noom Peerapong on Unsplash.