Carlos Bravo
on 2 February 2024
Generative AI on a GPU-Instance with Ubuntu on AWS: Part 1 – Image Generation
We recently published a technical document showing how to install NVIDIA drivers on a G4DN instance on AWS, where we covered not only how to install the NVIDIA GPU drivers but also how to make sure to get CUDA working for any ML work.
In this document we are going to run one of the most used generative AI models, Stable Diffusion, on Ubuntu on AWS for research and development purposes.
According to AWS, “G4dn instances, powered by NVIDIA T4 GPUs, are the lowest cost GPU-based instances in the cloud for machine learning inference and small scale training. (…) optimized for applications using NVIDIA libraries such as CUDA, CuDNN, and NVENC.”
G4DN instances come in different configurations:
| Instance type | vCPUs | RAM | GPUs |
| g4dn.xlarge | 4 | 16 | 1 |
| g4dn.2xlarge | 8 | 32 | 1 |
| g4dn.4xlarge | 16 | 64 | 1 |
| g4dn.8xlarge | 32 | 128 | 1 |
| g4dn.12xlarge | 48 | 192 | 4 |
| g4dn.16xlarge | 64 | 256 | 1 |
| g4dn.metal | 96 | 384 | 8 |
For this exercise, we will be using the g4dn.xlarge instance, since we need only 1 GPU, and with 4 vCPUs and 16GB of RAM, it will provide sufficient resources for our needs, as the GPU will handle most of the workload.
Image generation with Stable Diffusion
Stable Diffusion is a deep learning model released in 2022 that has been trained to transform text into images using latent diffusion techniques. Developed by Stability.AI, this groundbreaking technology not only provides open-source access to its trained weights but also has the ability to run on any GPU with just 4GB of RAM, making it one of the most used Generative AI models for image generation.
In addition to its primary function of text-to-image generation, Stable Diffusion can also be used for tasks such as image retouching and video generation. The license for Stable Diffusion permits both commercial and non-commercial use, making it a versatile tool for various applications.
Requirements
You’ll need SSH access. If running on Ubuntu or any other Linux distribution, opening a terminal and typing ssh will get you there. If running Windows, you will need either WSL (to run a Linux shell inside Windows) or PuTTY to connect to the machine using an external software.
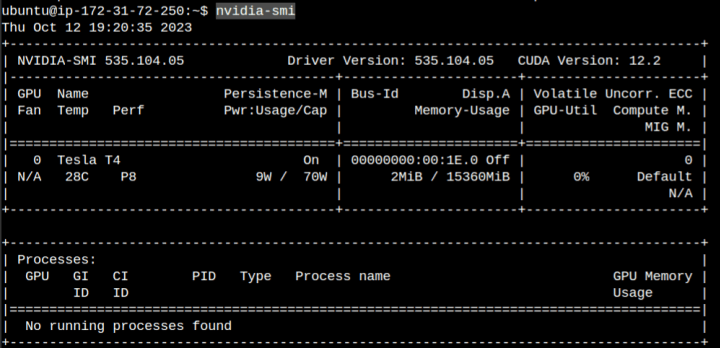
Make sure you have NVIDIA Drivers and CUDA installed on your G4DN machine. Test with the following command:
nvidia-smi
You should be able to see the driver and CUDA versions as shown here:
Let’s get started!
Step 1: Create a python virtual environment:
First, we need to download some libraries and dependencies as shown below:
sudo apt-get install -y python3.10-venv
sudo apt-get install ffmpeg libsm6 libxext6 -y
Now we can create the Python environment.
python3 -m venv myvirtualenv
And finally, we need to activate it. Please note that every time we log in into the machine, we will need to reactivate it with the following line:
source myvirtualenv/bin/activate
Step 2: Download the web GUI and get a model.
To interact with the model easily, we are going to clone the Stable Diffusion WebUI from AUTOMATIC1111.
git clone https://github.com/AUTOMATIC1111/stable-diffusion-webui.git
After cloning the repository, we can move on to the interesting part: choosing and downloading a Stable Diffusion model from the web. The numerous versions and variants available may complicate your journey initially. As you delve deeper, you will discover that you may require specific, fine-tuned versions tailored to your needs.
HuggingFace is a great resource for this task, as they host a plethora of models and checkpoint versions that you can download. Please be mindful of the license model of each model you will be using.
Go to HuggingFace, click on models, and start searching for “Stable Diffusion”. For this exercise, we will use version 1.5 from runwayml.
Go to the “Files and versions” tab and scroll down to the actual checkpoint files.
Copy the link and go back to your SSH session. We will download the model using wget:
cd ~/stable-diffusion-webui/models/Stable-diffusion
wget https://huggingface.co/runwayml/stable-diffusion-v1-5/resolve/main/v1-5-pruned.safetensors
Now that the model is installed, we can run the script that will bootstrap everything and run the Web GUI.
Step 3: Run the WebUI securely and serve the model
Now that we have everything in place, we will run the WebUI and serve the model.
Just as a side note, since we are not installing this on a local desktop, we cannot just open the browser and enter the URL. This URL will only respond locally because of security constraints (in other words, it is not wise to open development environments to the public). Therefore, we are going to create an SSH tunnel.
Exit the SSH session.
If you are running on Linux (or Linux under WSL on Windows), you can create the tunnel using SSH by running the following command:
ssh -L 7860:localhost:7860 -i myKeyPair.pem ubuntu@<the_machine's_external_IP>
In case you are running on Windows and can’t use WSL, follow these instructions to connect via PuTTY.
Once the SSH tunnel has been created, we can access the previous URL in our local desktop browser. The entire connection will be tunneled and encrypted via SSH.
In your new SSH session, enter the following commands to run the WebUI.
cd ~/stable-diffusion-webui
./webui.sh
The first time will take a few minutes as it will install PyTorch and all the required dependencies. After it finishes, it will give you the following local URL:
http://127.0.0.1:7860
So open your local browser and go to the following URL: http://127.0.0.1:7860
We are ready to start playing.
We tested our first prompt with all the default values, and this is what we got. Quite impressive, right?
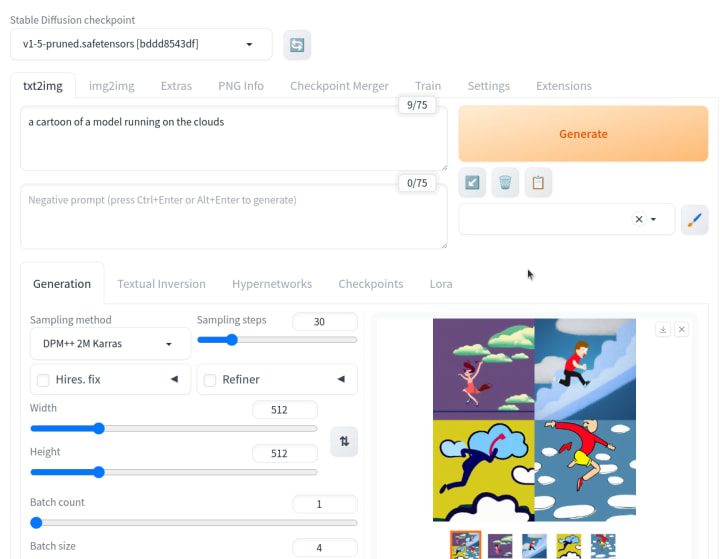
Now you are ready to start generating!
Final thoughts
I hope this guide has been helpful in deploying the Stable Diffusion model on your own instance and has also provided you with a better understanding of how these models work and what can be achieved with generative AI. It is clear that generative AI is a powerful tool for businesses today.
In our next post, we will explore how to deploy and self-host a Large Language Model, another groundbreaking AI tool.
Remember, if you are looking to create a production-ready solution, there are several options available to assist you. From a security perspective, Ubuntu Pro offers support for your open source supply chain, while Charmed Kubeflow provides a comprehensive stack of services for all your machine learning needs. Additionally, AWS offers Amazon Bedrock, which simplifies the complexities involved and allows you to access these services through an API.
Thank you for reading and stay tuned for more exciting AI content!