Jeremie Deray
on 29 April 2020
If you are a regular reader of our blog, you already know that our team got its hands on some TurtleBot3 robots. In previous posts, we have seen how to build them better, and how to improve the robot’s security with Ubuntu. In this post we will see how to build a snap to get started and set up the TurtleBot3 in a matter of minutes as opposed to going through the hassle of the whole installation process. Furthermore, we are expecting to run the snap on the TurtleBot3 itself, resulting in a self-contained robot.
This post explains how to rearrange launch files, configuration files and how to integrate this to lay the groundwork and set up our snap for the TurtleBot3. A follow-up post will show how to build the snap for the Raspberry Pi 3b+, the robot’s embedded computer, both directly on it and remotely. Finally we will see how to install and start using our Snappy TurtleBot3!
If you are new to ROS, we encourage you to have a look at the ROS tutorials. More specifically, the tutorial 8 introduces roslaunch which we’ll make an extensive us here.
The turtlebot3c
The code name of this operation is turtlebot3c. And just like any other operation it starts with a plan. The TurtleBot3 is a great learning platform and offers many features. We thus are looking to identify the most important high-level functionalities to map to applications in our snap. To do so we browse the TurtleBot3 GitHub repository together with its documentation website. We identified 3+1 functionalities that we want in our snap:
coreis the soul of the robot. This application is responsible for turning on the actuators and sensors and for enabling the visualization of the robot in Rviz. It is our ‘+1’ as it encompasses all of the basic necessary components.teleopallows us to drive the robot by different means, a remote controller, a keyboard or the navigation stack.mappinglaunches the mapping algorithm that builds a representation of the environment into a map usable by the navigation stack.navigationallows the robot to autonomously navigate from its current location to a given goal while avoiding obstacles and maintaining an estimate of its own location. It relies on the map built by the mapping application.
Now that the functionalities are identified, we want to map our launch file system accordingly. Fortunately most bits are available from the TurtleBot3 git repository and we only have to assemble them to our liking. We do so in a separate ROS package to keep our changes nice and separated from upstream. Nothing complicated here, the package mostly hosts launch files and config files. The package, naturally named turtlebot3c, is available on a public GitHub repo.
Core
For the core app, we aim at grouping together the node that communicates control commands to the motors (the controller) and the nodes advertising the sensor readings. It also includes loading the URDF model to the rosparam server so that the robot TF tree is published over the ROS network as well. The following command effectively takes care of bringing up the robot:
roslaunch turtlebot3c_bringup turtlebot3c_bringup.launch
This alone allows us to start working with our robot since one can fully visualize it in Rviz and perform tasks such as sending control commands to the motors. However, some additional work can significantly improve the user experience as we will see.
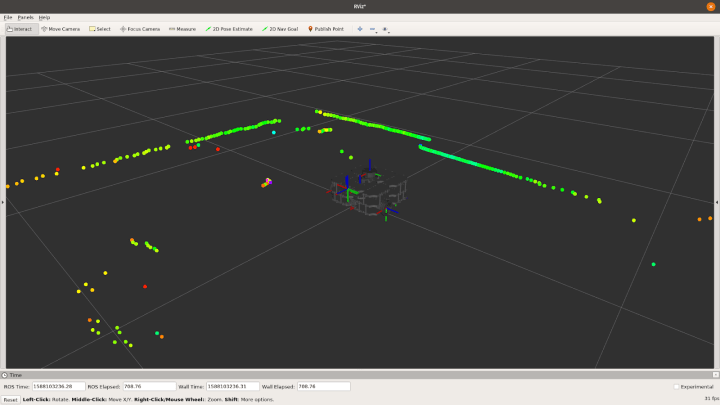
Visualization of the turtlebot3c at boot up.
Teleop
Suppose we have several nodes all publishing to the same topic. They are likely to interfere with each other. So how would you make sure to listen to one and only one source at a time? One solution is to use a multiplexer and that’s exactly what the mux node is. This node subscribes to several input topics but republishes only one of them. The choice as to which one is forwarded is done through a simple rosservice call. This feature comes in handy when one wants to drive the robot using different means, such as using a keyboard with the key_teleop, using a remote controller with the joy_teleop or leave it to the autonomous navigation stack. The mux node is exemplified below.

Graphical representation of the mux ROS node in use. Ovals and squares depict ROS topics and ROS nodes respectively.
One can choose which of its input the mux node will forward with a simple rosservice call. For example, the command:
rosservice call /mux/select "topic: 'joy_vel'"
allows the robot to accept velocity commands from the joystick node only.
The joy_teleop package is the second aspect of the teleop application and enables joystick control of the robot. But not only. This ROS node also allows for mapping the buttons and axles of a remote controller to publishing messages on topics, sending requests to services or even calling actions. This makes it the perfect interface to drive the TurtleBot3 with a remote controller while allowing you to switch from control command sources by the click of a button. The following command spawns the teleop application,
roslaunch turtlebot3c_teleop turtlebot3c_teleop.launch
Mapping
Several launch files exist in the TurtleBot3 repository to run and test different mapping applications and algorithms. Our task here mostly consists of selecting one algorithm that can be run directly on the Pi3 as those can be pretty computationally expensive. We picked for default gmapping, a well known, well established package in ROS. The mapping can be launch with the following command,
roslaunch turtlebot3c_2dnav turtlebot3c_mapping.launch
Once the mapping node has been launched, simply drive the robot around in order to map out the environment. Progresses can be easily monitored in Rviz. After the entire environment is mapped, remember to save the map before shutting the process down with the command:
rosrun map_server map_saver my/path/map
Navigation
Last but not least, the navigation app enables the autonomous navigation of the robot. It allows the robot to autonomously navigate from its current location to a desired goal while avoiding obstacles using the map generated by the mapping app. To start it, simply type the following command in a terminal,
roslaunch turtlebot3c_2dnav turtlebot3c_navigation.launch map_file:=my/path/map.yaml
where ‘my/path/map.yaml’ is the path to the map saved during mapping.
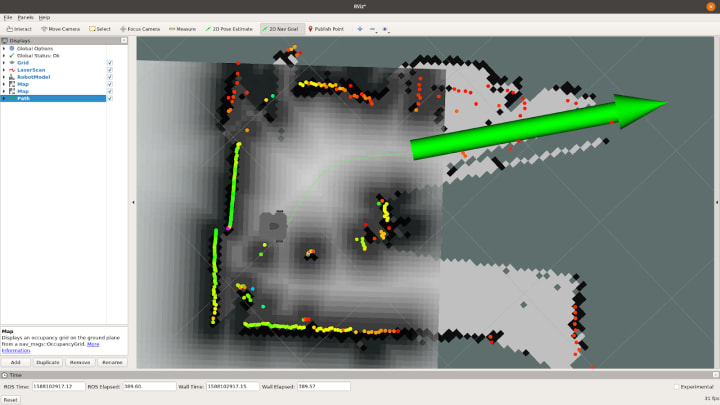
Sending a goal to the turtlebot3c through Rviz.
This concludes the first part of our TurtleBot3 set up. We have identified the different applications we would like to run on the robot and created the different launch files accordingly so that we have a one to one mapping between launch files and the desired snap applications.
In the second part, we will see how we can actually snap our ROS turtlebot3c project for the Raspberry Pi 3, executing the packaging process directly on the onboard computer. Finally we will set up the TurtleBot3 and start using it.