
How to deploy Managed Apache Kafka on Azure
This guide shows how to deploy Canonical Managed Apache Kafka, a Charmed Apache Kafka deployment operated by Canonical, into your Azure subscription. You configure the deployment in a seven-step wizard in the Azure portal; the whole process takes about 30 minutes.
For the architecture of the deployment and the meaning of the options below, see Managed Apache Kafka on Azure. To deploy and operate Charmed Apache Kafka on Azure yourself, see How to deploy on Azure instead.
Prerequisites
An Azure subscription where you can create resource groups and managed applications.
Enough vCPU quota in the target region for the VM sizes and counts you plan to select.
Optional: an existing Azure virtual network (VNet) and subnet to peer with your client applications. Its address range must not overlap with the range that the deployment reserves in the managed resource group. The Network step of the wizard shows this range.
Optional: an existing control plane from the Canonical Managed Juju deployment offering, in the same subscription.
Open the deployment wizard
Open the Canonical Managed Apache Kafka offering in the Azure portal.
Review the service scope and pricing.
Select a Plan and click Create.
The wizard opens on its first step, Basics. The tabs at the top show all seven steps:
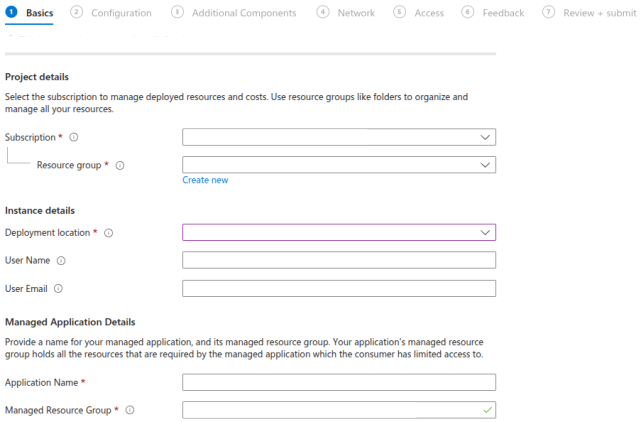
The first step of the deployment wizard
Complete the steps below in order. Click Next at the bottom of each step to continue to the next one.
Step 1: Basics
Select the target Subscription.
Select a Resource group for the managed application resource, or click Create new.
Select the Deployment location.
Enter the administrator User Name and User Email. Canonical sends the endpoints and credentials to this email address.
Enter the Application Name.
Optional: change the name of the Managed Resource Group. See Resource groups.
Step 2: Configuration
In Reuse an existing control plane deployment?, select:
No to provision a new control plane. Then, in Number of VMs for control plane, select
3for production or1for non-production environments.Yes to reuse your existing control plane. See Control plane.
Optional: click Change size to change the Control plane instance size.
Review the Management instance size.
Set the Broker Count:
3or more for production or1for non-production environments.Select the Disk Type for the brokers.
Optional: click Change size to change the Broker VM Size.
Optional: select Check vCPU quota to verify the capacity of your subscription before the deployment starts.
For how the VM counts affect the SLA, see High availability.
Important
If you keep the Ephemeral disk type for a production deployment, select
Enable separate Apache KRaft instances in the next step. See
Apache Kafka brokers.
Step 3: Additional Components
Select the components to enable:
Enable separate Apache KRaft instances
Enable UI for Kafka UI
Enable Karapace
Enable Apache Kafka Connect
For what each component does, see Controller VMs.
If you enabled any component, configure the Controller instances that host them:
Set the Number of VMs for the controllers: an odd number,
3or more for production or1for non-production environments.Select the Disk Type and the Disk Size.
Optional: click Change size to change the Controller VM Size.
Optional: select Check vCPU quota.
Step 4: Network
In Network connectivity, select how client applications reach the brokers and Kafka UI. For a comparison of the options, see Network connectivity.
To peer with an existing Azure virtual network, select Network peering. Then select the existing VNet and subnet of your client applications. The wizard doesn’t create them, so they must exist before you deploy. Make sure that their address range doesn’t overlap with the range shown in the warning on this step, which the deployment uses for the managed resource group.
To use public IP addresses, select Public IPs. Then, in Allowed IPv4 CIDR sources for Apache Kafka brokers and UI, replace
0.0.0.0/0with the CIDR ranges of your client applications.
Step 5: Access
Enter and confirm the Broker Password for the
operatoruser of Apache Kafka.If you enabled Kafka UI, enter and confirm the Kafka UI Password.
Step 6: Feedback
Optional: answer the questions about your experience with Apache Kafka and your workload goals.
Step 7: Review + submit
Check the configuration, the plan details, and the price.
Enter your Name, Preferred e-mail address, and Preferred phone number.
Under Co-Admin Access Permission, select I agree to the terms and conditions above to allow Canonical to manage the deployed resource groups. See Shared responsibility.
Click Create.
Check the confirmation email
When the deployment completes, Canonical sends a follow-up email from the Managed Solutions Portal with the connection details and instructions on how to get support. For what the connection details include, see Credentials.
Connect a client
Save the CA certificates from the email to a file, for example
ca.pem.Create a
client.propertiesfile with the broker username from the email and the broker password you set:security.protocol=SASL_SSL sasl.mechanism=SCRAM-SHA-512 sasl.jaas.config=org.apache.kafka.common.security.scram.ScramLoginModule required username="<username>" password="<broker-password>"; ssl.truststore.type=PEM ssl.truststore.location=ca.pem
List the topics to check the connection. Replace
<broker-endpoint>with a broker endpoint from the email, including the port:kafka-topics.sh --list \ --bootstrap-server <broker-endpoint> \ --command-config client.properties
If you enabled Kafka UI, open its URL from the email and log in with the username from the email and the password you set.